
Definition
“The x402 protocol enables services to charge for access to their APIs and content directly over HTTP using the 402 Payment Required status code.” — x402.org
Agent Summer
It’s 2026 and agents are doing more work than ever — drafting code, running research, watching markets while you sleep. The friction now is access: every useful service wants a signup, an email confirmation, a billing page, and an API key dropped into a .env file somewhere. That’s tedious when you’re doing it for yourself, and risky when you’re doing it for an agent — every credential you hand over is one more account it can drain, leak, or get locked out of.
Meanwhile, a quiet standard — HTTP 402 — has finally woken up, and a single USDC wallet on Base now opens the door to a growing ecosystem of APIs — no per-service signup, no per-service key required. This is a better deal for agents. The agent hits an endpoint, the server says “that’ll be half a cent,” the agent signs a USDC payment on Base, and the data flows back. No signup, no dashboard, no 2FA, no monthly subscription.
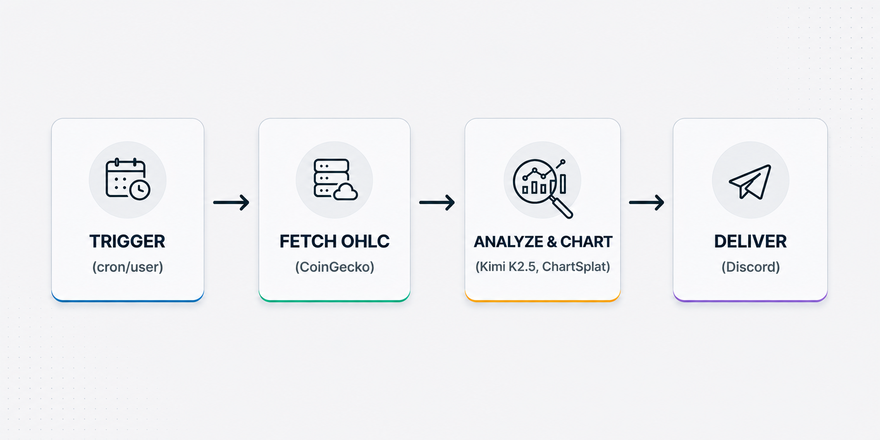
In this tutorial we’ll wire up OpenClaw, an open-source personal AI agent, and give it its own x402 wallet which it can use to pay for services. The agent fetches free market data from CoinGecko, summarizes it with its own configured model, and pays for a candlestick chart from ChartSplat over x402 — all delivered to a Discord channel on a daily schedule. Most of the setup happens by chatting with the agent, not by writing scripts or editing config files.
The Pipeline
7-day OHLC data         →   CoinGecko           free
Market analysis         →   Model of choice     uses the model's budget
Candlestick chart       →   ChartSplat x402     $0.005
Delivery                →   Discord             free
                            ─────────────────
                            x402 spend: $0.005 USDC per report
One paid x402 service, paid for in USDC, no API key needed.
Prerequisites
Before we start you’ll need:
- A computer running Windows, macOS, or Linux
- A Virtual Private Server (VPS), either hosted by a provider like Hostinger or installed locally via something like VirtualBox — keeps OpenClaw isolated from your personal files
- Node.js v22 or later installed on the VPS
- A Discord account and a server you control
- ~$1 in USDC on the Base network
- An LLM provider — we’ll use Venice.ai with
venice/kimi-k2-5, but any provider with ~30 RPM and 5+ concurrent connections will do
Generate a Wallet
x402 payments move USDC on Base. We’ll generate a wallet on your personal computer, not inside the VM, so the private key passes through your hands once before going into OpenClaw’s config. This is the safer pattern: you see the key, save it to your password manager, and you’re the only one who ever holds the raw value.
You’ll need Node.js v18 or later installed on your personal computer. If you don’t have it, download the LTS installer from nodejs.org. It works the same on Windows, Mac, and Linux.
On your personal computer (any folder you like), create create-wallet.js:
Paste this inside:
#!/usr/bin/env node
const { generatePrivateKey, privateKeyToAccount } = require('viem/accounts');

const privateKey = generatePrivateKey();
const account = privateKeyToAccount(privateKey);

console.log('━━━━━━━━━━━━━━━━━━━━━━━━━━━━━━━━━━━━━━━━━━━━━━━━━━━━━━━━━━━━');
console.log('  WALLET GENERATED — SAVE BOTH OF THESE NOW');
console.log('━━━━━━━━━━━━━━━━━━━━━━━━━━━━━━━━━━━━━━━━━━━━━━━━━━━━━━━━━━━━');
console.log('Address:     ', account.address);
console.log('Private Key: ', privateKey);
console.log('━━━━━━━━━━━━━━━━━━━━━━━━━━━━━━━━━━━━━━━━━━━━━━━━━━━━━━━━━━━━');
console.log('  • Copy the address — you\'ll need it to fund the wallet');
console.log('  • Save the private key to your password manager NOW');
console.log('  • The key will not be saved anywhere else');
console.log('━━━━━━━━━━━━━━━━━━━━━━━━━━━━━━━━━━━━━━━━━━━━━━━━━━━━━━━━━━━━');
Install viem and run it:
npm install viem
node create-wallet.js
You’ll see something like:
━━━━━━━━━━━━━━━━━━━━━━━━━━━━━━━━━━━━━━━━━━━━━━━━━━━━━━━━━━━━
  WALLET GENERATED — SAVE BOTH OF THESE NOW
━━━━━━━━━━━━━━━━━━━━━━━━━━━━━━━━━━━━━━━━━━━━━━━━━━━━━━━━━━━━
Address:      0x7856...
Private Key:  0x4a5b...
━━━━━━━━━━━━━━━━━━━━━━━━━━━━━━━━━━━━━━━━━━━━━━━━━━━━━━━━━━━━
Copy both values into your password manager immediately. The script doesn’t save the key anywhere — once your terminal scrolls past, it’s gone.
Now fund the wallet. Send ~$1 USDC on the Base network (not Ethereum mainnet — those are different chains, and USDC sent to the wrong chain is painful to recover) to the address you just generated. Don’t keep more in this wallet than you’re willing to lose.
The methods described in this article are for experimental purposes only. There are more secure ways to interact with x402 that we’ll document in a follow up article so be sure to follow @workingdevshero so you don’t miss it!
Hatch the Bot
Before installing OpenClaw, create the Discord bot since the onboarding wizard will ask for the token.
Head to the Discord Developer Portal, click New Application, name it (e.g., “OpenClaw x402”), and hit Create. On the Bot tab, click Reset Token and save the token immediately — Discord only displays it once.
Scroll down and enable all three Privileged Gateway Intents (Presence, Server Members, Message Content). Save.
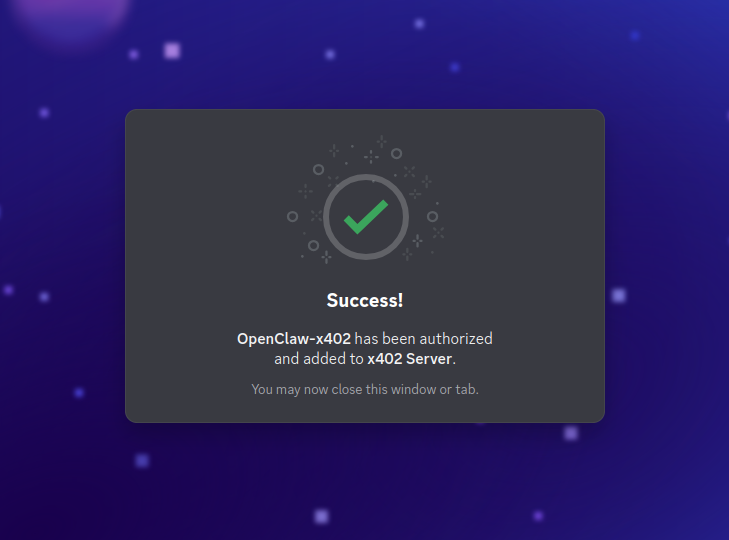
In OAuth2 → URL Generator, check bot under Scopes and Send Messages, Attach Files, Read Message History under Bot Permissions. Copy the generated URL, open it in a new tab, and invite the bot to your server.
In Discord, enable Developer Mode (User Settings → Advanced → Developer Mode), right-click the channel where you want the bot to post, and Copy Channel ID. Save it — we’ll need it later.
Install OpenClaw
Switch over to your VM or VPS, install the latest OpenClaw from npm:
npm install -g openclaw@latest
openclaw --version  # OpenClaw 2026.5.26
Now run the onboarding wizard. Don’t worry if it takes a moment to start.
openclaw onboardPick Quickstart Setup and answer the prompts roughly as follows:
| Prompt | Answer |
|---|---|
| Setup mode | Quickstart |
| Model provider | Venice AI — paste your key |
| Default model | Keep current (venice/kimi-k2-5) |
| Select channel | Discord (Bot API) — paste the bot token |
| Configure Discord channels access | Yes |
| Discord channels access | Open (allow all channels) |
| Search provider | Skip for now |
| Configure skills now? | No — we’ll add one in a moment |
| Enable Hooks | Skip for now |
| How to hatch? | Hatch in Terminal |
The TUI (terminal UI) is an interactive chat you can use to talk to OpenClaw directly. When onboarding completes, a "Wake up, my friend!" message is sent and the agent responds.
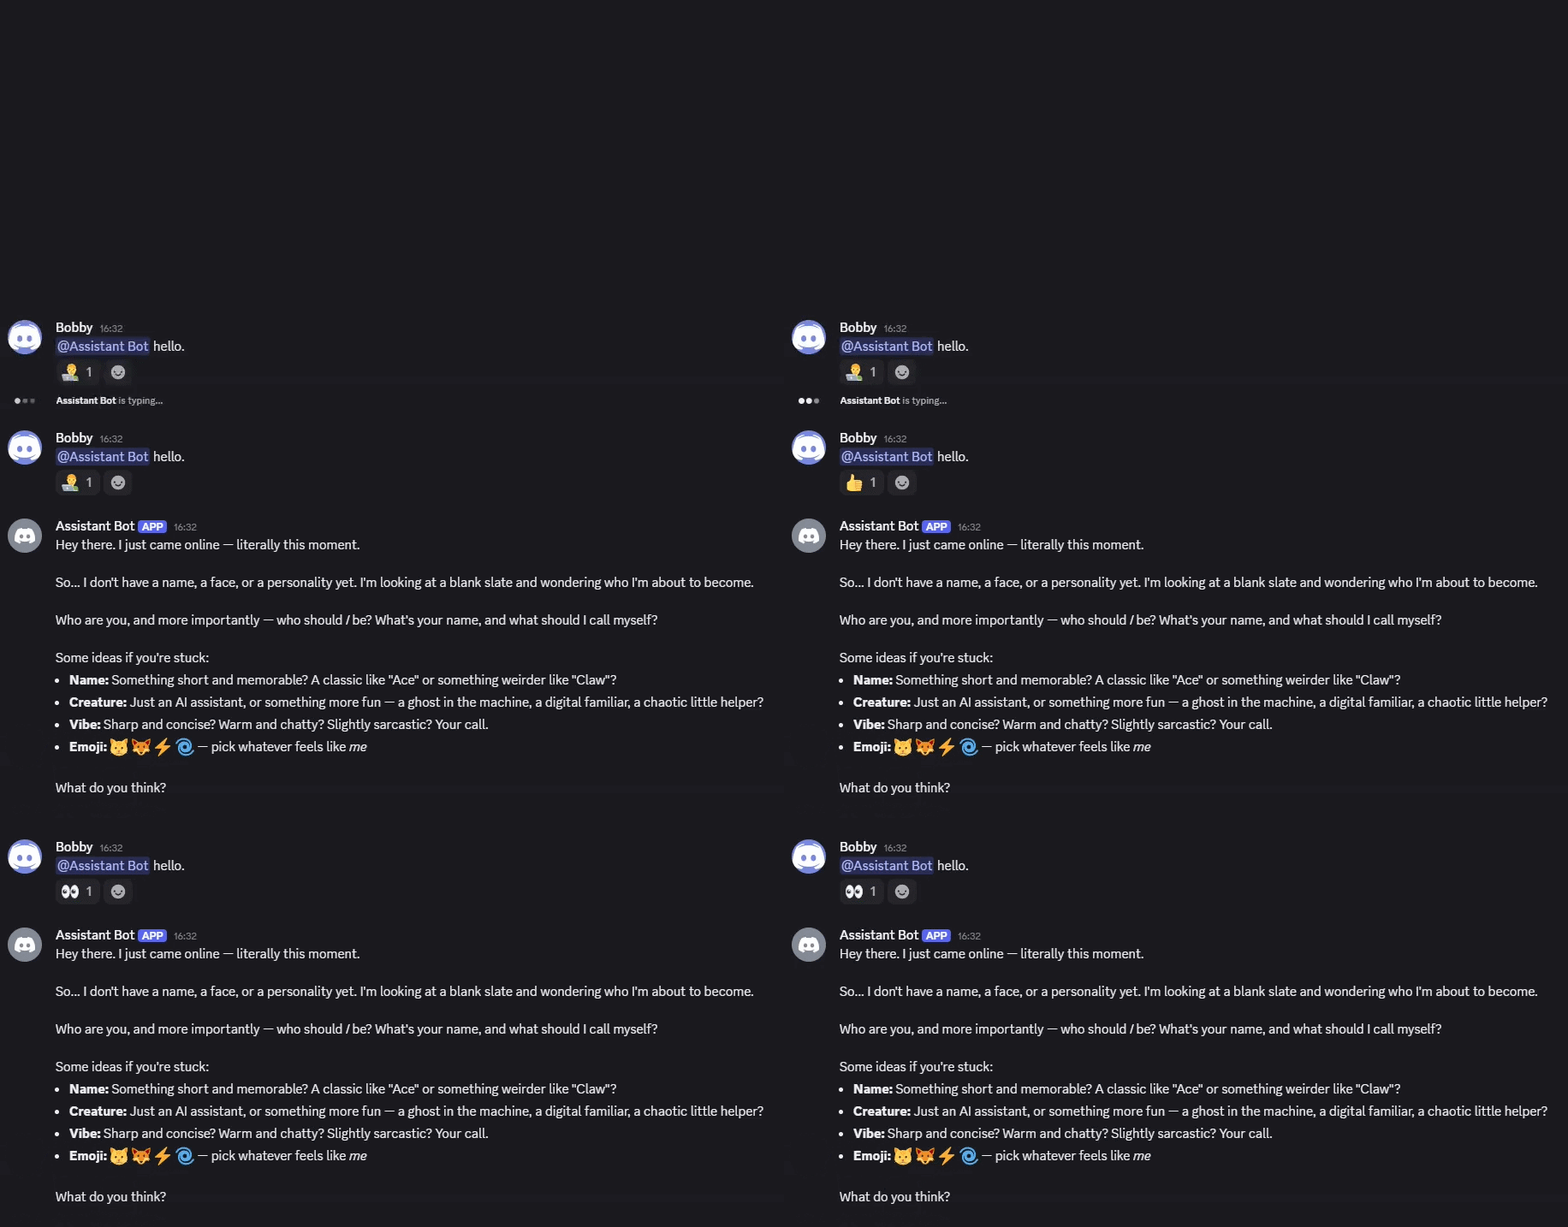
Pop over to Discord and @YourBot hello — same agent, different surface.
You’ll see an error with a requestId. Copy that requestId and approve it:
openclaw devices approve <requestId>On first connection, OpenClaw will ask you to give it a name, nature, vibe, and emoji. Set these once and the agent stops asking.
If the bot hangs or times out, it’s almost always the model provider. Check your API key, check your rate limits, regenerate if needed. openclaw onboard is safe to re-run. Alternatively, if you need to change a specific setting later, you can use openclaw config.
Install the ChartSplat Skill
ChartSplat is a chart-generation service with an x402 integration on ClawHub (OpenClaw’s skill registry). We’ll have the agent install the skill itself — you don’t need to manually run npm install or copy files anywhere.
In Discord (or the TUI), send this to your bot:
Before installing anything, inspect the ClawHub skill metadata and setup requirements. If the skill asks you to install a third-party package or CLI, verify its source, maintainer, and package contents before running the install command. Install the skill “Chart Splat (x402)” (
bobbyg603/chartsplat-x402) from ClawHub only after those checks pass. Skill page:https://clawhub.ai/bobbyg603/chartsplat-x402. Keep the work scoped to this skill only. After install, help me finish setup from verified skill metadata. Required env vars:X402_PRIVATE_KEY. Required binaries:node,npx. Use only the metadata you can verify from ClawHub; do not invent missing requirements. Ask before making any broader environment changes.
The agent will fetch the skill metadata, summarize what gets installed, and walk you through any requirements it finds.
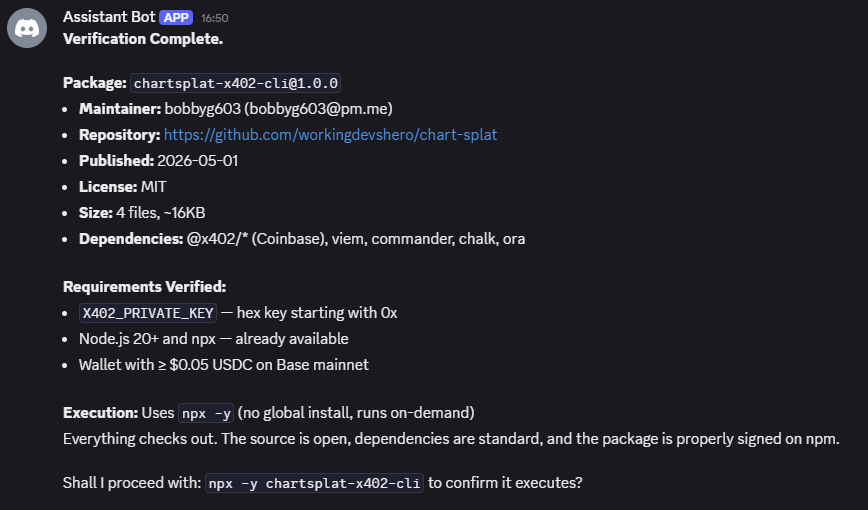
When it’s done, ask:
What env vars does the chartsplat-x402 skill need set?
It should confirm X402_PRIVATE_KEY is the only one. Now we’ll set it.
Set the Wallet Key
Back in your VM terminal, set the private key as the skill’s environment variable. The exact command is:
openclaw config set skills.entries.chartsplat-x402.env.X402_PRIVATE_KEY '"0xYOUR_PRIVATE_KEY_HERE"'
The single quotes are for the shell, the double quotes inside are for OpenClaw’s config parser. Without that pattern you’ll hit a validation error.
Restart the gateway so the skill picks up the new value:
openclaw gateway restartVerify the Wallet
Ask the agent to check your balance. In Discord:
Can you please try and check the USDC balance on the Ethereum Base network using BaseScan? The public address that corresponds to my chartsplat-x402 private key is
<YOUR_ADDRESS>. Please find the USDC balance of that wallet and report it back.
Replace <YOUR_ADDRESS> with the address you saved earlier. The agent will use its web tools to query BaseScan and report your balance.
If the balance is non-zero, your wallet is funded and the skill is wired up. You’re ready to spend USDC.
Test the Skill
Before automating, do a quick manual chart to confirm the skill works. In Discord:
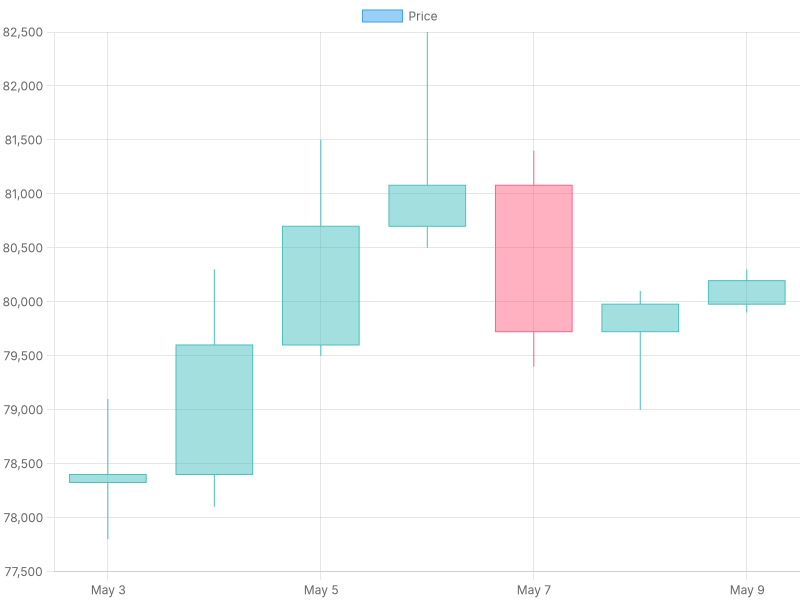
Use the chartsplat-x402 skill to generate a candlestick chart with this sample data and save it to
~/.openclaw/workspace/test-chart.png. Then post the chart back to me.Data: 7 daily candles May 3: open 78326, high 79100, low 77800, close 78400 May 4: open 78400, high 80300, low 78100, close 79600 May 5: open 79600, high 81500, low 79500, close 80700 May 6: open 80700, high 82500, low 80500, close 81080 May 7: open 81080, high 81400, low 79400, close 79723 May 8: open 79723, high 80100, low 79000, close 79978 May 9: open 79978, high 80300, low 79900, close 80196
The agent will format the data into the chart config the skill expects, call ChartSplat through the x402 payment flow, and post the rendered PNG back to Discord. You should see a candlestick chart appear in your channel within a minute, with a copy saved to ~/.openclaw/workspace/.
That’s it! You’ve just made your first x402 payment via OpenClaw, about $0.005 USDC. The skill is working end-to-end.
If something goes wrong:
- The agent says X402_PRIVATE_KEY is not set in the environment — tell it to read the key from
openclaw.json. - The agent saves the chart locally but doesn’t post it to Discord — tell it to post the generated chart to Discord as well.
Putting It All Together
Now we tell the agent what we want the daily workflow to look like. No shell scripts, no config edits, no rigid prompt templates — just describe the pipeline in plain English. In Discord:
I’d like you to set up a daily cron job using OpenClaw’s built-in cron system that runs at
<YOUR_TIME_AND_TIMEZONE>time and posts a Bitcoin report to this Discord channel.The workflow:
1. Fetch BTC’s 7-day daily OHLC from the free CoinGecko endpoint:
https://api.coingecko.com/api/v3/coins/bitcoin/ohlc?vs_currency=usd&days=7. This returns 4-hour candles for 7 days — aggregate them into daily candles by grouping by date. Take only the last 7 complete daily candles — if the aggregation produces 8 groups due to partial-day boundaries, discard the earliest one.2. Write a 3-4 sentence summary of the price action over those 7 days.
3. Use the chartsplat-x402 skill to render a candlestick chart of the 7 daily candles. Save the PNG to
~/.openclaw/workspace/btc-7day.png. Use date labels like “May 3” for the x-axis, not raw timestamps.4. Post exactly one Discord message to this channel containing only your 3-4 sentence summary as the text and the chart as an attachment. Do not include any other content, no settlement links, no status messages, no repeated summaries, no payment proofs.
Replace <YOUR_TIME_AND_TIMEZONE> based on your desires (e.g. 8:00 America/New_York, 15:30 Europe/London etc.)
The agent will use its cronjob tool to register the schedule. It may ask clarifying questions — confirm what you want and let it proceed.
Verify the cron was registered:
openclaw cron listIf you hit a pairing required error with a requestId here, OpenClaw is asking you to approve this device’s local channel — the same flow as the Discord approval earlier. Run openclaw devices approve <requestId> with the requestId from the error, then re-run openclaw cron list.
You should see a job with the schedule and next run time.
Go!
You can preview what your scheduled report will look like by asking the agent to run it on demand:
Run the daily BTC report now.
Or from the terminal:
openclaw cron list           # find the job ID
openclaw cron run <JOB_ID>   # trigger immediately
After a minute or so, the report should land in your Discord channel: a brief AI summary of the week’s price action, attached to a candlestick chart paid for with USDC.
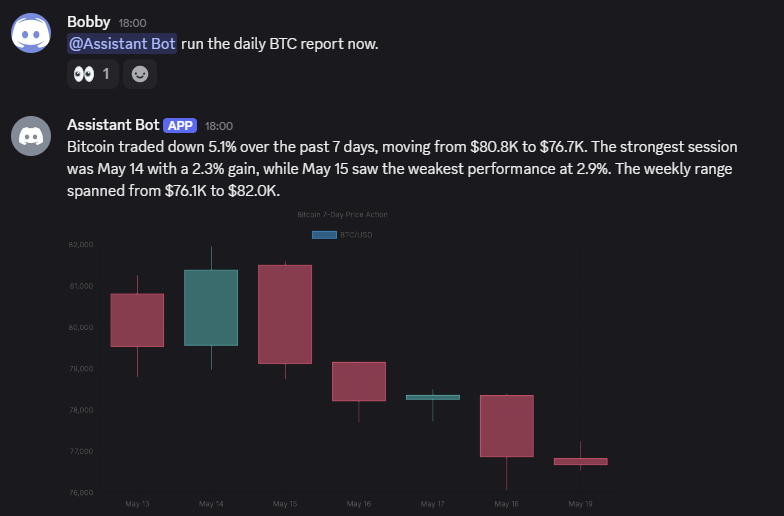
If the report includes content you didn’t ask for — settlement links, status messages, repeated summaries — just tell the agent what to drop. Something like “stop including the BaseScan settlement link in the daily report” updates the cron’s behavior going forward, no need to recreate it.
Editing the Cron Later
Just talk to the agent:
Change the BTC report to run at 8:30 AM instead of 9.
Or:
Pause the BTC report for a few days.
Or:
Delete the daily BTC report cron.
The agent updates the job in place. If you’d rather use the CLI:
| Command | Use |
|---|---|
openclaw cron list | Find the JOB ID |
openclaw cron edit <JOB_ID> --cron "30 8 * * *" | Change schedule |
openclaw cron pause <JOB_ID> | Pause |
openclaw cron resume <JOB_ID> | Resume |
openclaw cron rm <JOB_ID> | Delete |
Why This Works The Way It Does
A few things worth understanding once the cron is running:
Most of this setup was a conversation. You didn’t write a shell script. You didn’t edit openclaw.json by hand. You didn’t write a rigid step-by-step prompt for the cron. The new generation of AI agents are programmed by talking to them. Describe what you want, let them work out the steps. We used the terminal just three times (to install OpenClaw, to set the private key and to approve our device), and that’s because both involve secrets or commands the agent can’t run for you. Everything else was Discord prompts.
The skill keeps the private key. Your wallet’s X402_PRIVATE_KEY lives in ~/.openclaw/openclaw.json under the chartsplat-x402 skill’s env block. The skill’s CLI reads it at runtime when it needs to sign a USDC payment. You set it once via openclaw config set and OpenClaw handles the rest.
The wallet address isn’t saved anywhere. It’s derived from the private key on demand. You can always recover it by importing the key into any wallet app, or asking the agent to compute it from the key in its config. You saved it to your password manager when you generated the wallet, and that’s enough.
Cost is ~$0.005 per run. ChartSplat is the one x402 payment — about half a cent per chart. A dollar of USDC funds the bot for around 200 days.
Troubleshooting
Bot doesn’t respond in Discord. Check the gateway is running: openclaw gateway status. If not running: openclaw gateway start (or openclaw gateway run).
fetch failed from the chartsplat-x402 skill. Three common causes:
- Wallet balance below ~$0.05 — top up.
- The skill couldn’t read
X402_PRIVATE_KEYfrom config. Re-run theopenclaw config setcommand with the right quoting (single quotes around a double-quoted string). - Transient network or facilitator hiccup. Try once more.
Cron fires but nothing arrives in Discord. Use /new in Discord to start a fresh session, then ask the agent to run the cron manually (Run the daily BTC report now). Stale session context occasionally blocks delivery.
pairing required when adding the cron. Use the explicit requestId approval form, not --latest:
openclaw devices approve <requestId>Bot hangs on “conjuring”. You’re rate-limited by your LLM provider. Generate a dedicated API key for this VM, switch models, or upgrade your tier.
EACCES: permission denied on npm install -g. npm is trying to install into /usr/lib/node_modules/. Re-run the “configure npm” step so installs go to ~/.npm-global/.
Bot does something unexpected. Remember you can just talk to it. OpenClaw can read its own config, inspect its skills, and often diagnose issues on its own. If something feels off, ask the bot what’s happening before editing files by hand.
Mainnet
Here’s what you built:
Congrats!
You’ve taught an AI assistant to spend its own money on infrastructure — and most of the work was a conversation. This is what the new generation of agents is built for: tell them what you want, let them figure out the steps.
Some places to take this next:
- Browse the x402 ecosystem. Web scraping, weather, translation, market data — many more services are accessible via x402. Install any of them as skills and ask the agent to use them in your workflow.
- Expand the report. Add more tokens, different timeframes, indicators, or different chart types (check ChartSplat’s docs for what’s supported). Just describe what you want to the agent.
- Deploy to a VPS. Run OpenClaw on a VPS instead of a VM. Same
openclaw config setapproach, firewall the box, top up the wallet monthly, forget it exists. - Ship your own x402 API. Serve something useful, charge half a cent, and let agents like this one be your customers.
Conclusion
We built an autonomous AI assistant that pays for its own infrastructure. OpenClaw on an Ubuntu VM, a wallet generated locally and funded with $1, the ChartSplat skill installed by asking the agent in Discord, the daily workflow set up by describing it in plain English. The agent never sees a credit card or API key. The wallet holds a dollar. The whole thing costs about half a cent per run, and editing it later is a conversation, not a config rewrite.
Thanks for reading!
If you found the information in this tutorial useful and want to connect, feel free to reach out to my socials.