# Working Dev's Hero — Full Blog Content
> AI-enabled software development company. We build AI-powered software that ships.
# Upgrade Your Website with Animated Previews
> Send someone a link and iMessage can play a looping video in the preview bubble instead of a static image. Here's how we added animated previews to workingdevshero.com with og:video, why the first try only showed the picture, and the one-file Cloudflare Worker that fixed it.
- Published: 2026-10-22
- Author: bobbyg603
- Categories: Software, Tutorials
- Tags: open-graph, og-video, imessage, cloudflare, workers, ffmpeg, claude, heroic-lofi
- Canonical: https://workingdevshero.com/blog/animated-link-previews/
Most link previews are a still image. Send a link to workingdevshero.com in iMessage now and the bubble plays the video at the top of this post instead.
That's the Midnight Rooftop Flow loop from our [Heroic Lofi album](/blog/heroic-lofi-vibe-coding), with the site headline laid over the empty sky. We didn't make anything new for it: the album had already left us twenty animated scenes, each cut into a clean loop. A handful of meta tags asks for it. Getting it to actually play took one more fix.
## The Tags 🏷️
Open Graph has had an `og:video` property for years. Apple's link previews in Messages will download an MP4 from it and play it muted, on a loop, right in the conversation. Here's what we serve on the home page:
```html
```
A few things we settled on along the way:
- **The image is the video's first frame.** Previews show the image first, so starting the video on that exact frame means nothing jumps when it begins to play.
- **The video is silent and small.** 6 seconds, 1200×630 H.264, 237 KB. Apple caps a preview's images and video at 10 MB total, and smaller files start playing sooner.
- **The text is baked in with ffmpeg.** We lay out the headline as an HTML page, screenshot it with a transparent background in headless Chrome, and overlay it on every frame. One script rebuilds both files.
- **Only the default image gets the video.** Blog posts have their own hero images, so they keep a plain image preview instead of borrowing the rooftop, unless a post brings a loop of its own (this one uses the site's).
## Why It Only Showed the Picture 🔍
We shipped it, pasted the link into iMessage, and got the new image but no video.
The tags were right and the file was right. To see what Apple's side was doing, we ran the macOS LinkPresentation framework (`LPMetadataProvider`, the API apps use to build these previews) against the site. It found the image and returned no video at all.
So we served the same page and video from two local servers. The one that supports HTTP range requests (`Range: bytes=0-1` returns `206 Partial Content`) got a video. The one that doesn't got nothing. Production was the second kind: our site runs on Cloudflare Workers static assets, which ignores `Range` and always sends the whole file with a `200`. Safari has the same expectation, which is why some MP4s show a crossed-out play button there.
## The Fix 🔧
We added a Worker that only runs for video paths and turns a full response into the requested slice:
```jsonc
// wrangler.jsonc
"main": "./worker/index.ts",
"assets": {
"directory": "./dist",
"binding": "ASSETS",
"run_worker_first": ["/og-video.mp4", "/videos/*"]
}
```
The Worker fetches the file through the `ASSETS` binding, parses the `Range` header, and answers `206` with a `Content-Range`, or `416` when the range starts past the end. Every other path still goes straight to static assets with no Worker in the way. With it deployed locally, the same LinkPresentation check downloaded the full video.
## Then the Home Page 🌙
Once the loop was in previews, the home page's still hero looked a little flat next to it. The hero was already this scene, so it's now the loop too: a 16:9 version on desktop and a 9:16 one on phones, about 220 KB each. Both are set to `preload="none"`, and a few lines of script play only the one on screen, so phones never download the desktop file. Anyone with reduced motion turned on gets the first frame as a still.
## Copy It With Your Agent 🤖
This site's code is public, so you don't have to rebuild any of this from the snippets above. Point your coding agent at this post and tell it:
> Copy the animated link preview from workingdevshero.com/blog/animated-link-previews into this site, using our own logo and a short loop of our own.
The hard part is the loop itself, not the code. If you don't have one yet, the [Loops section of our album post](/blog/heroic-lofi-vibe-coding#loops) covers how we got clean ones out of an image-to-video model: what breaks the seam (slow camera zooms, waving capes, turning heads) and what holds.
These are the files it needs:
- [`scripts/build-og-video.mjs`](https://github.com/workingdevshero/web/blob/main/scripts/build-og-video.mjs) and [`scripts/og-video.html`](https://github.com/workingdevshero/web/blob/main/scripts/og-video.html): build the MP4 and the matching image from a loop and an HTML text overlay.
- [`src/lib/social-preview.ts`](https://github.com/workingdevshero/web/blob/main/src/lib/social-preview.ts) and [`src/layouts/BaseLayout.astro`](https://github.com/workingdevshero/web/blob/main/src/layouts/BaseLayout.astro): pick each page's preview and write the meta tags.
- [`worker/range.ts`](https://github.com/workingdevshero/web/blob/main/worker/range.ts), [`worker/index.ts`](https://github.com/workingdevshero/web/blob/main/worker/index.ts) and [`wrangler.jsonc`](https://github.com/workingdevshero/web/blob/main/wrangler.jsonc): the range-request fix, if you host on Cloudflare Workers static assets. Most other hosts already support range requests; `curl -sI -H "Range: bytes=0-1"` on your video will tell you (you want `206`).
- [`src/components/home/Hero.astro`](https://github.com/workingdevshero/web/blob/main/src/components/home/Hero.astro) and [`src/lib/hero-video.ts`](https://github.com/workingdevshero/web/blob/main/src/lib/hero-video.ts): the animated home page hero.
If you want to try it yourself, send [workingdevshero.com](https://workingdevshero.com) to a friend in iMessage. And if the rooftop looks familiar, the whole album is [on YouTube](https://youtu.be/Lq1RZYq4caM).
---
# How We Make Short Videos With Agents
> In one month we shipped four short spots, each with a cut for every feed, without opening a video editor. Claude Code builds them in Tesseract from real app recordings and a track picked first, and a person reviews every cut. Here's the process and what we'd tell anyone trying it.
- Published: 2026-10-22
- Author: bobbyg603
- Categories: AI, Tutorials
- Tags: video, claude, tesseract, venice, automate-it, marketing, ai-agents, heroic-lofi
- Canonical: https://workingdevshero.com/blog/how-we-make-short-videos/
Between September 23 and October 23 we made four short videos: three ads for [Automate It](https://automate.it.com) and one for the [animated link previews](/blog/animated-link-previews) on this site. Each one has a vertical cut for TikTok, Reels and Shorts and a wide cut for LinkedIn, X and YouTube. Nobody opened a video editor.
They're made the way Automate It works: **AI drafts, a human reviews.** An agent builds every cut, and a person watches it and says what's wrong. Here's the setup, then what we learned.
## The Setup 🧩
- **The editor: Claude Code driving [Tesseract](https://github.com/mirage-hq/Tesseract).** Tesseract is a local video engine built for agents. It takes layers, keyframes, text and audio as JSON and renders an MP4 on your machine. Claude never drags a clip. It writes a small Python script that describes the whole edit, and Tesseract renders it.
- **The footage: the real product.** For Automate It, Playwright drives Chrome at 3× pixel density in dark mode and records each beat, like typing a prompt or clicking Approve, with a drawn cursor and a ring on every click. For the link previews video, Claude drove the iOS simulator from the command line with AXe: open Messages, paste the link, wait for the preview.
- **The music: picked before anything else.** The Automate It ads use a 120 BPM track we generated with ElevenLabs Music through [Venice](https://venice.ai). The link previews reel uses another Venice track, and its LinkedIn cut uses "City Lights Boot Sequence" from our [Heroic Lofi album](/blog/heroic-lofi-vibe-coding).
- **The repo: one place for every source file.** A private `marketing` repo holds each spot's build script, footage, fonts, music and editable project, with the media in Git LFS. One command rebuilds any video, and we check that the rebuild matches the approved one frame for frame.
## Music First, Then Picture 🎵
The first brief listed beats at 0, 1.2, 3.0 and 7.5 seconds. None of those land on a tempo. So we pick the track first, map its downbeats, and put every cut on one. At 120 BPM that's a 500 ms grid. The link previews reel runs at 128 BPM, so a bar is 1,875 ms, and the card pops onto the screen on a downbeat.
An agent can't listen, so it does this from a waveform: it finds the kicks, measures the bar length, and checks the rendered mix against the plan. A person still listens to every cut, because the waveform can't tell you whether a track is any good. We threw out the first song for the link previews reel for exactly that reason.
## Real Screens, Moving 🖱️
Our first Automate It cuts used 3× screenshots with a slow push-in. They were crisp, and two marketing friends told us they felt flat and moved too fast. So we replaced the stills with recordings of the real app: the cursor moving, the prompt being typed, the click landing.
The recorder takes a full-resolution screenshot after every cursor step or keystroke and holds each one for its own duration. That gives a smooth 60 fps clip at 3× no matter how slow the browser is. One lesson cost us something: the first takes of the approve beat really clicked Approve, and approved two test drafts. Now the recorder only draws the click ring. None of its beats save, submit or publish anything.
## One Script, Two Layouts 📐
A Tesseract project has one canvas size, so the vertical cut isn't a crop of the wide one. Each spot is a single spec that gets laid out twice. The wide cut puts the text on the left and the screen on the right. The vertical cut puts the whole line above the screen and keeps the bottom third clear for TikTok's and Instagram's buttons.
Different feeds also want different videos, not just different shapes:
| Where | Cut | Length |
|---|---|---|
| TikTok, Reels, Shorts, Facebook | Vertical, fast, music up | 17 seconds |
| LinkedIn, X, Threads | Wide, calmer, one technical detail | 32 seconds |
| Google Business Profile | The wide cut, trimmed | Under 30 seconds |
The LinkedIn cut of the link previews video, at the top of this post, slows down and explains the catch: iMessage only plays the video if your server answers byte-range requests. That detail fits a LinkedIn audience. The reel for the same video skips it, because it just needs to show the preview playing:
## Every Line Has to Work on Mute 🔇
Most people watch these without sound, so the words carry the video. Every line gets the same test: does it make sense to someone scrolling past with the sound off?
- **"Together, they are Supermog."** It was copied from the post on screen, and it meant nothing outside that post. It became **"Posted to your socials."**
- **"Set it once."** It sat over a big *Weekly* button, so the line and the screen contradicted each other. It became **"Scheduled, on autopilot."**
- **"Copy the animated link preview from workingdevshero.com/blog/animated-link-previews."** Nobody remembers a URL that long. We added a short link, and the line became **"Add animated link previews to my site like workingdevshero.com/previews."**
We also cut a whole opening that parodied engagement bait ("Comment YES for the guide!"). Nobody got the joke. They thought we were offering a guide. If a joke needs explaining, it doesn't belong in the first two seconds of an ad.
## Hold Long Enough to Read ⏱️
Every round of feedback on every spot asked for the same thing: more time on screen. The hook, the moment the preview starts playing, and the end card each got longer. The link previews reel grew from 15 to 17 seconds, and the LinkedIn cut from 28 to 32. We'd rather lose a viewer to a slow second than to a line they couldn't finish.
## Keep the Audio Boring 🔈
Agents love sound design: risers, whooshes, a dip under the title, a tap on every button. Our feedback was "we don't need vacuum noises." The Automate It ads play one track at one level and cut it on a downbeat, with one hit on the end card. The link previews reel keeps two effects, a pop when the card appears and a whoosh into the call to action, because each marks something happening on screen. The LinkedIn cut has no effects at all.
## Check the Render, Not the Plan 🔍
The agent checks every export the way a person can't: frame by frame. That catches problems a quick watch would miss.
- **A blank frame in the source.** The simulator recording has one frame where the preview card is plain purple. It lasts 3 milliseconds and still showed up in an export, so the builder skips it.
- **A two-frame blink.** In the Google Business cut, two copies of the same background loop overlapped during a crossfade, and the renderer dropped both for two frames. The fix was giving the end card its own copy of the file.
- **Platform rules.** Google Business Profile rejects videos over 30 seconds or 30 fps. Our first 60 fps Automate It exports failed there twice before we checked.
Text that looks centered often isn't, so the agent also measures the pixels inside every box and moves the text until the space above and below match.
## Making the Ad Is QA 🐛
Filming your own product means using it closely. The Automate It shoot turned up a square focus ring inside a rounded prompt box, and every native file upload failing on iOS. The link previews shoot turned up a bug in Automate It's agent tools: they showed the name of the account that connected LinkedIn instead of the company page it posts to. All three became GitHub issues before the videos were done.
## What You Can Steal 🧠
1. **Pick the music first and cut on its beats.**
2. **Record the real product, with a visible cursor.** Make sure the recorder can't change anything.
3. **Write every line to work on mute, on its own.**
4. **Lay out the vertical cut separately, and make a separate cut for each kind of feed.**
5. **Hold every line long enough to read twice.**
6. **Use sound effects only to mark something on screen.**
7. **Check the export, not the plan.** Scan the frames, measure the loudness, and test against each platform's limits.
8. **Keep the build script and the source files in a repo,** so any cut can be rebuilt exactly.
The agent did the grunt work: dozens of rebuilds, retimings and re-renders. Every good decision in the final cuts still came from a person watching and saying "that's not right yet." Every post that shares these videos goes through the same review queue in [Automate It](https://automate.it.com) before it publishes.
---
# Stop Prompting, Start Art Directing: How to Get AI Images That Aren't Slop
> A vague prompt gets you the model's average: dark navy, glowing circuits, neural hexagons. Here's the art direction spec that escapes it, and why every clause in it earns its place.
- Published: 2026-10-07
- Author: bobbyg603
- Categories: AI, Tips & Tricks
- Tags: ai, generativeai, design, prompting, automate-it, podcasting
- Canonical: https://workingdevshero.com/blog/art-direction-beats-prompts/
Two podcasts run off the same [Automate It](https://automate.it.com) workspace. Same models, same pipeline, same week. One of them ships cover art we barely think about. The other came back with a batch we rejected as nonsense: glowing hexagons, circuit lines, a hologram hovering over nothing in particular, none of it connected to anything in the episode.
The models weren't the variable. The art direction was.
## The Default Look 🌀
Ask an image model for "a cover image about AI and commerce" and you get the average of everything it has ever seen captioned *AI*: deep navy background, glowing blue circuitry, a neural-network hexagon lattice, a translucent chart floating over an open palm, lens flare for seasoning.
That look is not a style decision. It's the mean of the training data, and a vague prompt is an instruction to go stand in the middle of it. This is the actual mechanism behind AI slop. It isn't that the model is bad at drawing. It's that you asked for nothing in particular and it gave you the most statistically unsurprising thing available. Everyone else asking vaguely gets the same image.
The fix isn't a cleverer sentence. It's refusing to leave the decisions to the model in the first place.
## The Spec 🎨
Here's the art direction that rides along with every episode of *Agentic Commerce Weekly*:
> flat vector editorial, retro mid-century, thick dark navy outlines, cream #F5F0E8 / navy #1A2E4A / coral #E8543A / amber #F5A623, subtle paper grain, no text or letters or numbers anywhere, no dark neural or sci-fi imagery
That's not a prompt. It's a visual system that happens to fit on one line. Whatever the episode is about, the image it produces will be recognizably from the same show as last week's, which is the entire job of cover art.
## Why Each Clause Earns Its Place 🔧
- **A named medium.** "Flat vector editorial" rules out the photoreal 3D render the model reaches for by default. You are not asking for *a nice image*, you are asking for a specific kind of made object, and every other kind is now off the table.
- **A named era, and a tradition to imitate.** "Retro mid-century" points at real design history. Editorial illustration in the Bloomberg or Economist vein is a tradition with rules about flat shapes, limited color, and one idea per frame. Give the model something concrete to imitate and it stops averaging everything at once. Name a tradition, not a person: when we made our [Heroic Lofi album](/blog/heroic-lofi-vibe-coding), naming a real artist in a music prompt got the request refused on content policy. Describing the sound worked. Pointing a model at a movement is also on firmer ground than asking it to copy one living artist.
- **Hex codes, not color words.** "Warm palette" is a request for interpretation, and the interpretation will drift every single generation. `#E8543A` doesn't drift. Four hex values also do quiet structural work: they cap the palette, which forces flat shapes and hard edges instead of the gradient mush a model defaults to when it has infinite colors to blend.
- **Explicit bans.** "No dark neural or sci-fi imagery" is doing as much work as any of the positive instructions. The defaults are strong enough that you have to name them to get rid of them. Same for "no text or letters or numbers anywhere," which spares you the confident gibberish glyphs image models love to decorate with. When an image genuinely needs words, like a thumbnail title or a sign in the scene, don't ask the model to letter it. It will only approximate your font. Set the real type in HTML, screenshot it, and put that on the image.
- **One legible metaphor per image.** The rule we care about most isn't in the palette at all: every element has to *mean* something specific about that episode. A story about a payment protocol gets one clear object standing for the payment. It does not get a circuit board, three hexagons, and a padlock arranged decoratively. That's icon soup, and icon soup is what a model produces when nobody told it what the picture is about.
That last one is what the rejected batch was missing. The images weren't ugly. They were about nothing.
## The Control Group 🧪
The sibling show's direction, in full, was "deep navy + electric accents."
Read it again and notice what it is: a description of the default. It names no medium, no tradition, no exact colors, and bans nothing. It's a vibe, and a vibe that happens to sit directly on top of the model's center of mass. So it produced exactly the generic look, over and over, and we kept rejecting batches without being able to say much more than "this is nonsense."
Same platform, same models, same week, two wildly different outcomes. The only variable was how specific the spec was.
## The Spec Isn't the Whole System 📌
A one-line spec is enough for a cover a week. It started slipping when we pushed it across a whole series. For the [Heroic Lofi album](/blog/heroic-lofi-vibe-coding) we generated twenty illustrated scenes over about two weeks. The style was written down from day one: flat 2D vector, plum and gold, not painterly, not chibi. Halfway through, new scenes still started coming back in 3D perspective with heavy outlines.
Two things pulled it back:
- **Show it, don't just tell it.** Pass an image you already approved as a reference alongside the spec. Words describe the style; an approved image *is* the style.
- **Keep the prompts that worked.** The fix for the drifting scenes was to dig up the exact prompts behind the ones we'd kept and reuse their wording. Your ban list grows every time you reject something. Your library of approved prompts should grow every time you keep something.
And when an image is close but not right, revise from the version you approved, not from the model's last attempt. Every edit on top of an edit drifts a little further. Five rounds of "fix the eyes" gave us bug eyes, then a different character entirely.
## The Checklist ✅
Steal this for whatever you're generating:
1. **Name the medium.** Flat vector, risograph print, gouache, cut paper, 35mm film still. Pick one and commit.
2. **Name the palette in hex.** Three to five values. Not "muted," not "warm," not "earthy."
3. **Name a reference tradition.** A design era, a publication, a movement. Something with actual rules the model can borrow.
4. **Ban the defaults out loud.** Write down the slop you keep getting and forbid it by name. Your ban list is the most valuable part of the spec, and it grows every time you reject something.
5. **Require each element to mean something.** One idea per image, mapped to one concrete object. If you can't say what a shape is doing there, it shouldn't be there.
6. **Keep what you approve.** Save the approved images and the prompts behind them, and use them as references for the next one.
None of this makes the model more creative. It makes the model do less deciding, which is the point. The taste is yours. The spec is just where you write it down so it survives contact with the next hundred generations.
**Got an art direction line that actually works? Post it and tag us on [X @workingdevshero](https://x.com/workingdevshero).**
---
# Heroic Lofi for Vibe Coding: One Developer, Twenty Songs, and a Lot of AI
> How one developer made a 47-minute illustrated lo-fi album in a little over two weeks with Grok, Grok Imagine, ElevenLabs, and Claude. What worked, what fought back, and why it still feels like magic.
- Published: 2026-09-30
- Author: bobbyg603
- Categories: AI, Tutorials
- Tags: ai, grok, claude, venice, elevenlabs, imagine, lo-fi, music, video-loops, agents
- Canonical: https://workingdevshero.com/blog/heroic-lofi-vibe-coding/
## Intro 🎧
Twenty instrumental tracks, about 47 minutes, each one with its own animated scene, a recurring cast of characters, and a release plan that runs for three weeks, all made without a recording studio, a drawing tablet, or a video editor. It's now possible for a single motivated software developer to make an entire album.
**[Listen to the full album on YouTube](https://youtu.be/Lq1RZYq4caM)**, or browse every scene and track at **[lofi.workingdevshero.com](https://lofi.workingdevshero.com)**.
It's lo-fi, so let's keep expectations honest. This isn't going to win a Grammy. But it's a real album you can put on while the tests run: the same characters from track to track, drawn in flat vector art that reads like a graphic novel, each scene animated into a (mostly) seamless loop. A year ago, one person making this in a little over two weeks would have been absurd. And this is the worst this technology will ever be.
This is the story of how it came together, what fought back, and what we'd tell you if you wanted to make one yourself.
## Plan 🗺️
It started as a conversation. Before generating a single image, we sat down with Grok 4.7 and planned the whole thing: one night of vibe coding on the rooftops of a city, told across twenty tracks. We wrote a slate with every track's title, its length, its tempo and key, and who'd be in the scene, and then set the rules of the world. The visual bible was the existing [Working Dev's Hero](/) mascot: clean 2D vector, a plum, gold, and moonlight palette, adult superhero proportions. Every scene should look like a panel from the same book.
Then we picked the tools. Grok Imagine would paint the scenes, populate them with characters, and bring them to life. ElevenLabs' music model, through [Venice](https://venice.ai), would write the songs. Everything else (trimming, muxing, the long-form cut) would be `ffmpeg` and a few hundred lines of Python an agent could write and run for us. No DAW, no video editor, no Photoshop.
The plan felt tidy. What followed was a lot of back and forth.
## Scenes 🏙️
The single most useful decision we made was to create each scene first, then populate it with the characters one by one.
Grok Imagine generated every rooftop, fire escape, and interior empty, and once we liked one, we froze it and never touched it again. When we tried to generate the scene and the people in one go, we kept getting two art styles in one frame.

*The frozen empty plate for Cape On, IDE Open. The finished scene is this rooftop plus two people, not a new rooftop.*
The cast needed the same discipline. There are five of them: Hero, the lead, still coding at 3 AM; his younger sidekick; and the three Working Dev's Hero agents. Neo is our Hermes agent, always on call and wearing sunglasses indoors, and Claudius and Claudia are our two OpenClaws. Each one got a board on a flat plum background, approved on its own before going anywhere near a scene.
*The cast, left to right: Hero, the sidekick, Neo, Claudius, and Claudia.*
This is where most of the early struggle lived. The sidekick started life as a green copy of Hero: same mask, same boots, same beard. The version that worked made him a younger sidekick with no mask, his own boots, and a slimmer build. Even then, he'd balloon to a giant head in the wide shots until we started prompting with comparisons like *"his head is the same size as the sitting hero's head."* And every time we asked the edit model to fix something on top of its last attempt, things drifted further: bug eyes, then a different art style, then a different person. The fix was always the same: go back to the last version we'd approved and make one new edit from there.
*The sidekick, three ways he didn't make the album: a second Hero in plum, a green Hero with the same mask and beard, and the giant head.*
Populating the scenes used Grok Imagine's edit model with the frozen plate and the character boards as references. Adding the characters one by one mattered, because two in one edit usually meant one of them came out wrong. We learned to check the image size after every edit, because one quietly came back square. And we learned to save the prompt behind every plate we kept: halfway through, new plates started coming back 3D and outlined, and the fix was reusing the wording of the ones that worked.
*Two tries at a diner scene. The first came back too 3D, the second like a diagram. Neither made the album.*
## Loops 🔁
Then came the part that ate the most time. Grok Imagine's video model can turn a still into six seconds of motion, but it isn't a loop model. Asking for "first frame equals last" is a wish. So for every track we generated takes, measured which frames matched, and had a person scrub through and pick the cut.
*Cape On, IDE Open, looping: Hero typing, the sidekick standing still and blinking.*
The biggest enemy was the camera. A slow zoom you barely notice in a six-second clip breaks the seam every time it loops, and it happened on at least six of the twenty tracks. What finally held was saying it like we meant it:
```
Non-negotiable: the camera stays locked. No zoom, no pan, no push-in.
Only animate the character in the black suit and the lobster.
The billboard and the hero stay absolutely static for the entire clip.
```
The rest was a long list of small lessons. A waving cape looks alive but never matches at the join, so we froze the capes and named typing and a blink as the only motion. Eyes that move loop; heads that turn don't. Playing a clip forward and then backward saved four tracks, but it can't save fog drifting across the frame. And Hero's slim white mask lenses were a constant fight. The video model wanted to give him pupils.
Every loop was made in 16:9 first, and the 9:16 version for Shorts was cropped from it. Cropping only goes one way, and animating a second portrait version is a second roll of the dice.
## Music 🎹
While the scenes came together, the songs did too. ElevenLabs Music through Venice takes a text prompt and a length and returns an instrumental, usually within a minute or two. The first pass at all twenty tracks cost under $40.
We learned to describe the sound and never name an artist (that gets the request refused), to vary the lengths so the songs didn't all come back with the same shape, and to cap everything under three minutes so each one could be a YouTube Short. We also learned to listen to the first and last few seconds of every track, because generated songs love to hide crackle, a screech, or a stray blip right at the edges.
Then we lived with the album for a few days, and it didn't hold together.
## Handoff 🤝
Working with Grok, we made the first ten tracks and a first pass at the other ten. By the back half, the long-running session had lost the plot. It kept remaking the same tracks without converging, and we couldn't put a finger on why the album felt off.
So we brought in Claude to finish the job, starting with fresh ears. It couldn't actually *listen*, but it could measure. It analyzed all twenty songs for loudness, brightness, how sharp the note attacks were, and which songs sounded alike. The numbers explained what we'd been feeling. Piano or electric piano led sixteen of the twenty songs, with four in a row in the back half. The ElevenLabs piano has a sharp, glassy attack, and 128 kbps audio doesn't help. The loudness swung 6.6 dB from track to track, and the closer was the loudest song on the album.
From there it was a collaboration. Claude proposed new prompts that changed the lead instrument instead of the mood: muted jazz guitar, a soft vibraphone in the rain, a muted guitar lullaby, and a warm analog synth. Each one put drums and bass in from the first bar, so the lead never sits exposed:
```
Instrumental lo-fi hip hop, 78 BPM, A minor, about 2 minutes 32 seconds.
A clean electric jazz guitar with the tone knob rolled down plays a slow,
singing melody over warm chords. Dusty boom-bap drums and a round upright
bass from the first bar. No piano, no bright attack, no long intro.
Light tape saturation. No vocals, no lyrics, loop-friendly ending with no crash.
```
Claude measured; we listened and decided. Twice we kept a track the numbers flagged, because we loved it. Twice the better song lost to the one that fit the album, so those went into a folder for the next one.
Rubber Duck on the Ledge shows how that back and forth really went. It was the last song we replaced, the night before launch, and it went through three versions.
The original prompt asked for something quiet:
```
Instrumental lo-fi hip hop, 70 BPM, F minor, about 1 minute 48 seconds.
Sparse warm Rhodes, bowed bass, drums whispered in late after 0:40.
Quiet late-night conversation in the chords, vinyl dust, almost nothing extra.
```
Two things were wrong with what came back. The sparse arrangement left the piano's glassy attack exposed. And although we'd asked for F minor, the song came back in A-flat major, which uses the same notes and happens to be the key of Rainy Bus Stop Deploy, the very next track. Back to back, they sounded like one song that wouldn't end.
*The original Rubber Duck on the Ledge, opening.*
*The original running into Rainy Bus Stop Deploy. Same key, same feel.*
Claude's first fix overcorrected. It swapped the piano for a soft, breathy flute trading phrases with an upright bass, in D major. On paper it solved both problems. In practice it sounded like it belonged on a different album, and our honest reaction was "what in tarnation."
So we steered back toward home: drums and bass from the first bar, and a warm, muffled electric piano in the low and middle register with a gentle tremolo, "like it's coming from the next room," in D minor. We queued three takes. One hung at Venice for more than thirteen minutes and never came back, so we queued a replacement and kept listening. The first take of the batch was the keeper: it still sounds like the rest of the album, and it finally steps away from its neighbor.
*The final Rubber Duck on the Ledge, opening.*
*The final version running into Rainy Bus Stop Deploy.*
Claude also did the finishing work we wouldn't have known to do: leveling every track to the same loudness, trimming dead air, crossfading the long cut, and computing the YouTube chapter timestamps from the same numbers so they can't drift.
## Launch 🚀
The release plan went through its own back and forth. Where we landed: every track gets its own YouTube Short, one a day at 8 PM Eastern, each a 9:16 crop of its scene. The wide 16:9 versions stay off YouTube as standalone videos, so they don't spend the full album, which launches as one 47-minute video. Around that, we planned a launch-day announcement on X, Threads, Facebook, LinkedIn, and Discord, Instagram and TikTok reels for a handful of favorite scenes, a cast introduction, a few behind-the-scenes threads, and a last call after the final Short.
That's a lot of posts for one person, so every Short, reel, carousel, and thread went through [Automate It](https://automate.it.com) for review and scheduling. AI drafts, a human approves, then it ships. That review step earned its keep. Late in the project, after we'd remade six songs, we found the approved Shorts still carrying the old audio, and a forgotten Short with an outdated video and a placeholder title. Because everything sat in one review queue, catching and swapping them took minutes.
## Gold ⛏️
We want to be honest about the downside, because it's real.
Working this way feels a lot like mining for gold. Sometimes you swing the pickaxe once and hit a nugget on the first try. Other times you dig for days and never quite strike what you're after, turning up a giant-headed sidekick, a camera that won't sit still, or a song with a glassy piano that sets your teeth on edge.
And because every swing costs nothing but a prompt and a click, it starts to feel less like mining and more like a slot machine. You describe what you want, pull the lever, and see what comes out. A lot of those two weeks went into pulling the lever again, and learning which prompts tilt the odds.
Here's what that looked like in practice, counted from the session logs:
| | |
|---|---|
| Days of work | 11, between September 14 and September 30 |
| Scene and character stills generated | 40 |
| Image edits (placing characters, fixing faces and boards) | 354 |
| Video takes for the loops | 210, for 20 loops |
| Songs generated | 69, for 20 tracks |
| Music cost | under $140 in Venice credits |
| Rate and credit limits hit | 7 logged (6 on Grok Imagine, 1 on Venice) |
That's about ten video takes for every loop we kept, and three or four songs for every track. And those are just the logged calls. We also maxed out our SuperGrok Heavy subscription on a few occasions, though in fairness we were building other things with it at the same time, like [Supermog](/blog/supermog-builds-itself).
Making something from scratch without generative AI is much harder. But it gives the artist maximum control: every brushstroke and every note is a decision. Here, a lot of our decisions were *choosing*, not *making*. We could steer, reject, and refine, but we couldn't always get exactly what we had in mind. For a lo-fi album to code to, that trade was worth it. For something more personal, it might not be.
## Magic ✨
Even with all of that, the whole thing still feels magical. One developer, a few AI tools, and a little over two weeks produced an illustrated album with a cast, twenty animated scenes, and a three-week release plan. The tools will get better: longer loops, real control over the camera, higher-fidelity audio, fewer pulls of the lever. It'll be fascinating to watch what's possible a year from now, and a few years after that.
If you want to make one yourself, everything is out in the open. Every scene and song on **[lofi.workingdevshero.com](https://lofi.workingdevshero.com)** has the exact prompt that made it behind a hover. The MP3s, loops, character boards, and scripts are all in [workingdevshero/lofi](https://github.com/workingdevshero/lofi). Steal whatever helps.
**[Put the album on while you code](https://youtu.be/Lq1RZYq4caM)**, and if you make something of your own, send it to [X @workingdevshero](https://x.com/workingdevshero). We'd love to see it.
---
# Supermog: We Built a System That Builds Itself
> A fleet of agents that implements GitHub issues end-to-end: independent AI review, verification with video evidence on real browsers and phones, automatic rebases, and auto-merge. It runs 24/7 on two Raspberry Pis we found in a drawer, and most of it was built by itself.
- Published: 2026-08-31
- Author: bobbyg603
- Categories: AI, Software
- Tags: ai, claude, grok, github, agents, automation, raspberry-pi, cloudflare
- Canonical: https://workingdevshero.com/blog/supermog-builds-itself/
Right now, while you read this, a fleet of agents in our lab is ripping through GitHub issues. They will open pull requests, hand them to separate, independent agents for review, then *prove* the changes work by driving real browsers and real phones, posting the video to every PR. They will address the review feedback, keep each branch rebased as the work merges around it, and then merge. They did this last night while we slept. They will do it again tonight. They never get tired, never get bored on rebase number forty, never ask whose turn it is to review — and honestly, we're a little in awe of them, and immensely grateful for them. Together, they are **Supermog**.
Here's the part that still makes us grin: **most of Supermog was built by Supermog.** Somewhere in week one the loop closed. We stopped implementing features and started filing issues ("you should rebase your own branches," "you should merge your own PRs") and the system grew the ability while we watched. Filing an issue at midnight and waking up to the implemented, reviewed, video-verified PR never stopped feeling like magic. This project was, without competition, the most fun we've ever had building software: two weeks of pair-building the seed with Claude, then progressively getting out of the way as the thing took over its own development.
And the tireless little factory running it all? Two Raspberry Pi 5s we found in a drawer, left over from other projects.
*The fleet at work: two Pironman 5 towers, two old Android phones on verification duty, and, if you look closely, the pixel mog hammering away on each OLED.*
## What Supermog Actually Is 🤖
Supermog is a v2. [The original Mog](/blog/mog) turned an issue into a PR inside a Docker sandbox and did nothing else, and everything it lacked became this system's spec.
Three pieces:
**A GitHub App.** Supermog installs like any other app, with narrowly scoped permissions (contents, issues, PRs, statuses, workflows; read-only where read-only will do). Work is triggered by webhooks: a trigger label on an issue, or an `@supermogger` mention on a PR with a directive: `review`, `verify`, `eat` (address feedback), `merge`, `rebase`, `remog`. Plain prose after a mention is treated as review feedback and acted on.
**A control plane at the edge.** A Cloudflare Worker plus one Durable Object holds the queue, job history, secrets, and the dashboard. It costs approximately nothing and never falls over when a Pi does. Cloudflare is just the first home: the core is runtime-neutral, and support for deploying the control plane to more infrastructure providers is in the works.
**Agents on whatever hardware is around.** Workers scale horizontally and don't care what they run on: a worker is any box that can dial *out* to the control plane over a single WebSocket and pull jobs. Ours happen to be the two Pis; nothing about the design needs them to be. No inbound ports, no tunnels into the house. An issue moves through three lanes, one job at a time: **Develop** implements it, reviews the PR and addresses the feedback; **QA** runs the checks, brings the repo's stack up and verifies the result; **Release** rebases onto whatever merged in the meantime. Logs and evidence are kept on the box's own disk and streamed to the dashboard.
Security got real attention, because the failure mode is "a robot with commit access": org and repo allowlists on every trigger path, a write-only secrets portal (GitHub Actions style: you can paste a value in, nothing ever displays it back), secrets stripped from child process environments, log masking, and containers that can't reach the host. The agents only touch repos you've explicitly listed.
## How It Grew: Every Bottleneck Became a Feature 🌱
Supermog wasn't designed; it was *iterated*, and the repo's history reads like a lab notebook. The pattern repeated a dozen times: hit a bottleneck, file an issue about it, and, increasingly, let Supermog build the fix itself.
- **Day 1: one runner, browser verification.** The first version implemented an issue and then proved it: a Chromium instance drove the actual feature and posted screenshots and video to the PR. Not "tests pass" — here are the pixels.
- **Day 1: device verification.** A Pi 5 doesn't have the muscle to run an Android emulator, so we plugged in the real thing: old phones from the same drawer. A physical device gets the PR's build over adb, an agent drives the real app, and the recording lands on the PR. A constraint that became a feature: verification on actual hardware.
- **Week 1: one unified verify step.** Browser and device verification collapsed into a single general-purpose verification stage: one QA agent, whatever surfaces the repo declares. Someday we'd like it to drive a full desktop, not just a browser or a phone.
- **Week 2: a second runner, then a real control plane.** One Pi was too slow. Adding the second forced the honest architecture: a server/agent split, one WebSocket per box, and the server rebuilt runtime-neutral so it could move to Cloudflare Workers.
- **Week 2: the SD card era ends.** pi-1's SD card died mid-review (`mmc0: Card stuck being busy!`) while the agent kept heartbeating from page cache. We moved both boxes into Pironman 5 cases: the NVMe SSD moved from a USB-C enclosure to real PCIe and became the OS disk. Faster clones, no more card roulette, and the three fans took the SoC down from ~55 °C (131 °F) to comfortable.
- **Week 2: the staleness war.** With our bots continuously writing PRs, branches rot fast. Fixes landed in layers: rebase-on-command, then automatic branch updates whenever anything merges (GitHub's server-side update when clean, an agent job when conflicted), then `Depends-on: #N` for stacked PRs — and finally for issues, a piece Grok implemented through Supermog's own pipeline.
- **Week 2: it files its own bugs.** When a run hits something wrong, the agent reports it through [BugSplat](https://www.bugsplat.com)'s user feedback tool, tagged with Supermog's own trigger tag, so the bot picks its own report back up as work. The agent is both the user and the developer. The loop closed.
- **Week 2: CI moved home.** GitHub Actions billing broke our pipeline **three times**: every check across every repo went red until we raised the spending limit, again. Then the obvious hit us: these boxes are on 24/7 anyway. The Pis became our self-hosted Actions runners: zero billed minutes, faster native arm64 builds, and the Actions queue got its own lane on the status page.
- **This week: it merges and ships itself.** Two human steps fell in one week. Supermog publishes a `supermog/verified` commit status summarizing its round, arms GitHub auto-merge on its own PRs and un-arms if a later round reopens findings; branch protection does the rest. Then a push to main started rolling the fleet: the control plane drains a box, swaps its image, waits for the new build to report over the socket, and moves to the next. Its very first outing stopped itself on a bad image reference and left the box safely drained on the old build — exactly the failure behavior you'd want from a system that ships itself.
- **This week: three lanes, three queues.** A box used to run one job at a time, so a slow verification held up everything behind it. The fix wasn't a bigger queue, it was admitting an issue is only ever in one state: **Develop**, **QA** or **Release**, each with its own line and its own capacity on each box. A job is one lane's work. When it finishes it puts the issue at the bottom of the next lane's line and hands its slot straight back — no job ever sits on a slot it isn't using, and a queued issue holds nothing at all. QA stays single-file per box, because it brings up the repo's entire stack; the other two run several at a time, and the limits are set per machine, so a laptop with sixteen cores is not held to a Raspberry Pi's numbers. Getting there meant deleting a lot of clever code that had been carefully arranging for work to wait.
- **This week: we swapped models mid-outage.** On September 3, ChatGPT, Claude and Grok [went down within minutes of each other](https://www.axios.com/2026/09/03/chatgpt-claude-grok-outages) — the correlated failure everyone assumes is rare. Our worker started hanging mid-job. Which model implements and which one reviews are settings, so we pointed both roles at a provider that was still answering and the queue kept moving. No redeploy, no code change, about two hours lost. The lesson we took: independent review is what matters, not which model performs it — and anything you depend on should be swappable while it is running.
Along the way the dashboard grew everything an operator actually needs: per-runner detail pages, queue reordering by drag, metrics and token tracking, a lessons store (per-repo things the bot learned the hard way, injected into future prompts), a usage guard that pauses claiming work near API rate limits, human-needed notifications, one-click pause/update, and, because why not, brandable theming.
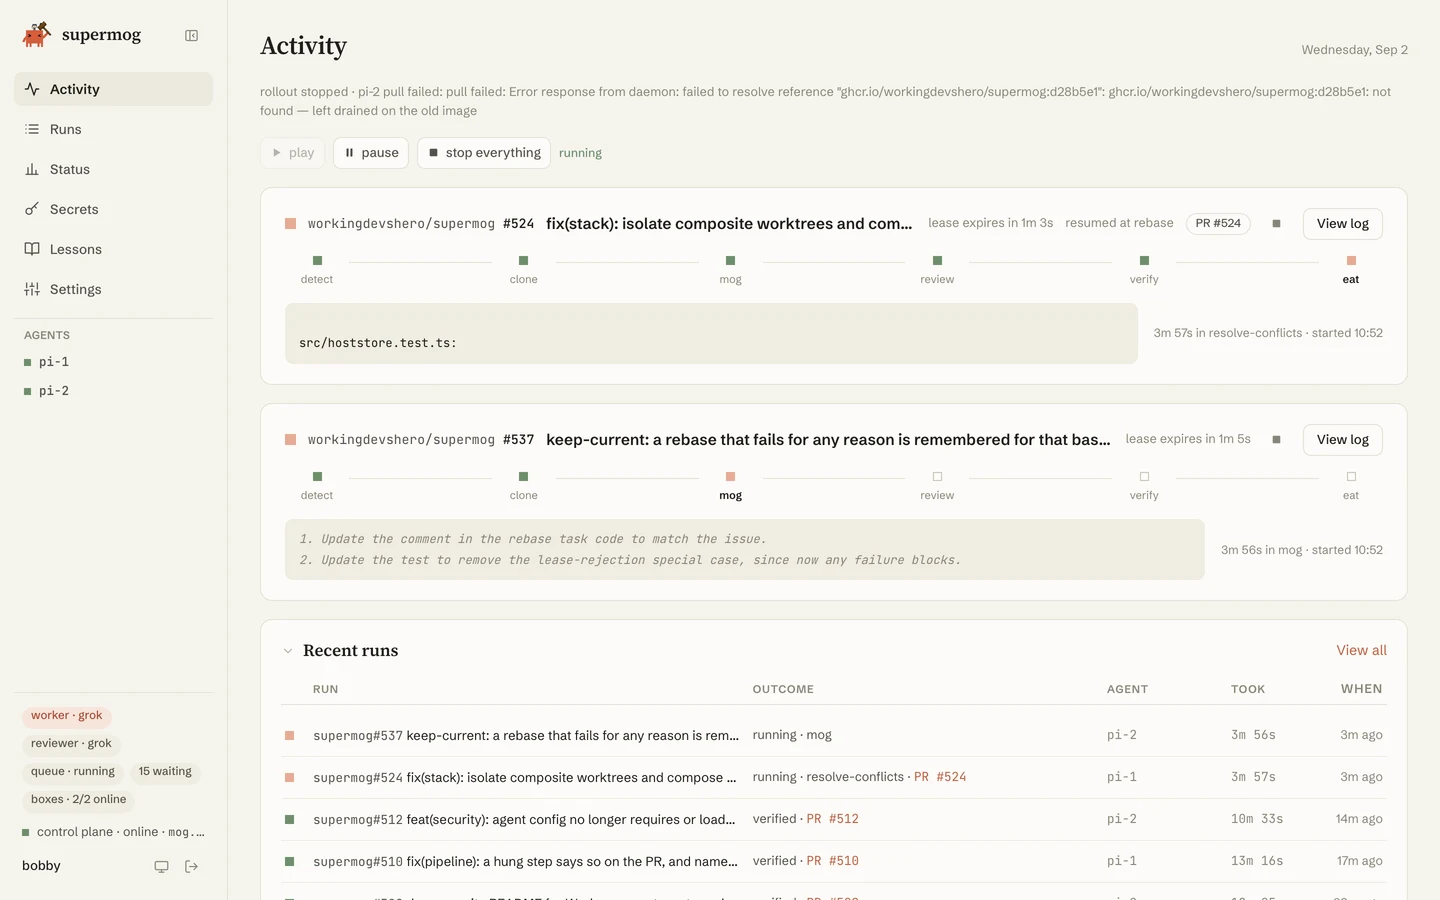
*Nine runs in flight across two boxes, thirty more waiting. Develop, QA and Release each hold their own line, so a slow verification blocks only QA.*
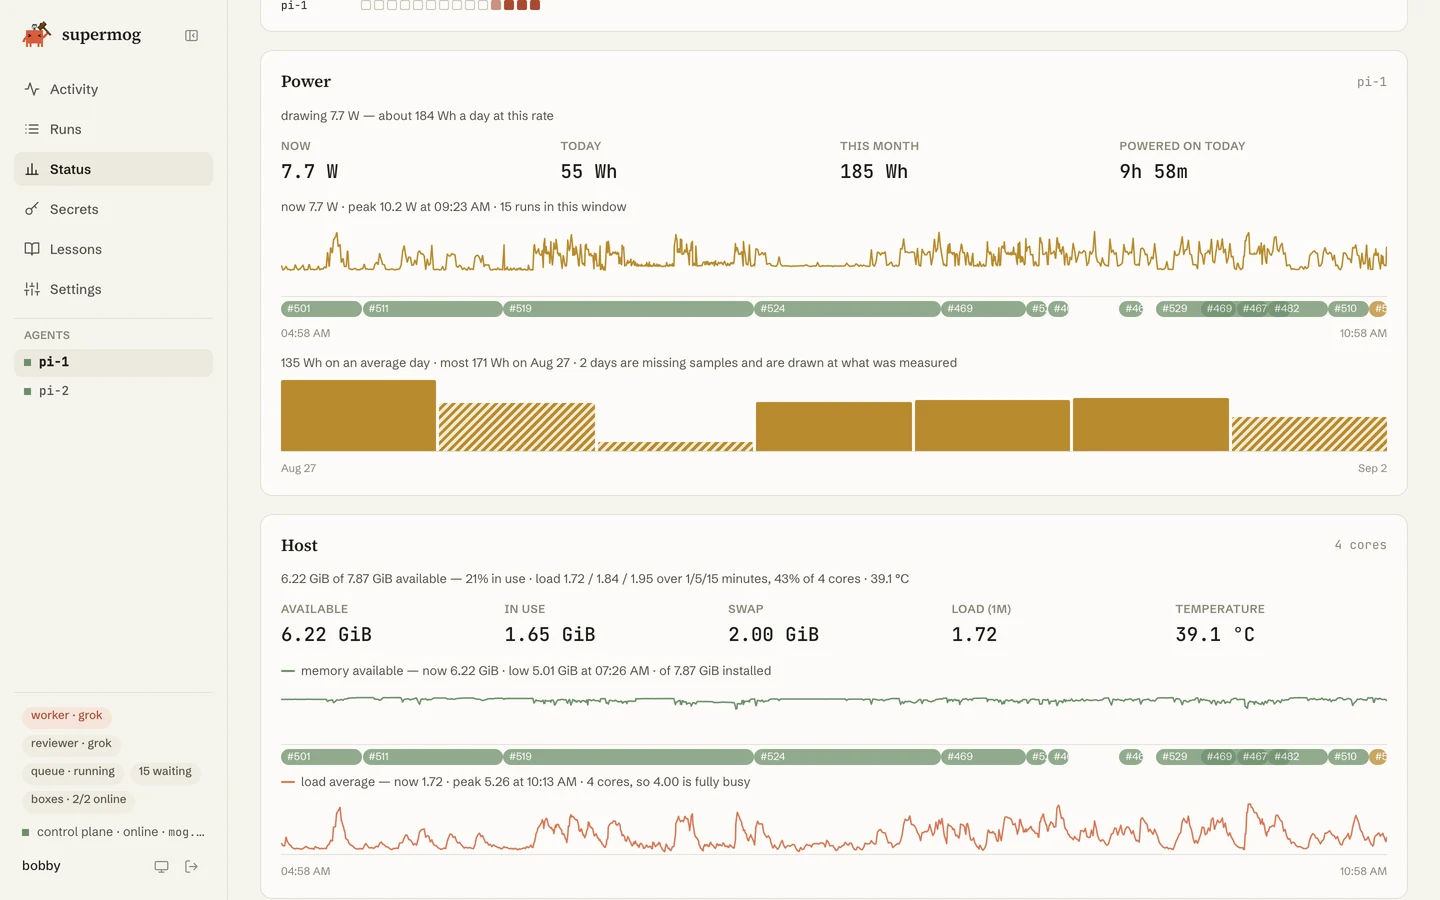
*Each box's hardware page. Yes, that says **7.7 watts** — the whole factory draws less than a lightbulb, and the Pironman fans keep it under 40 °C flat out.*
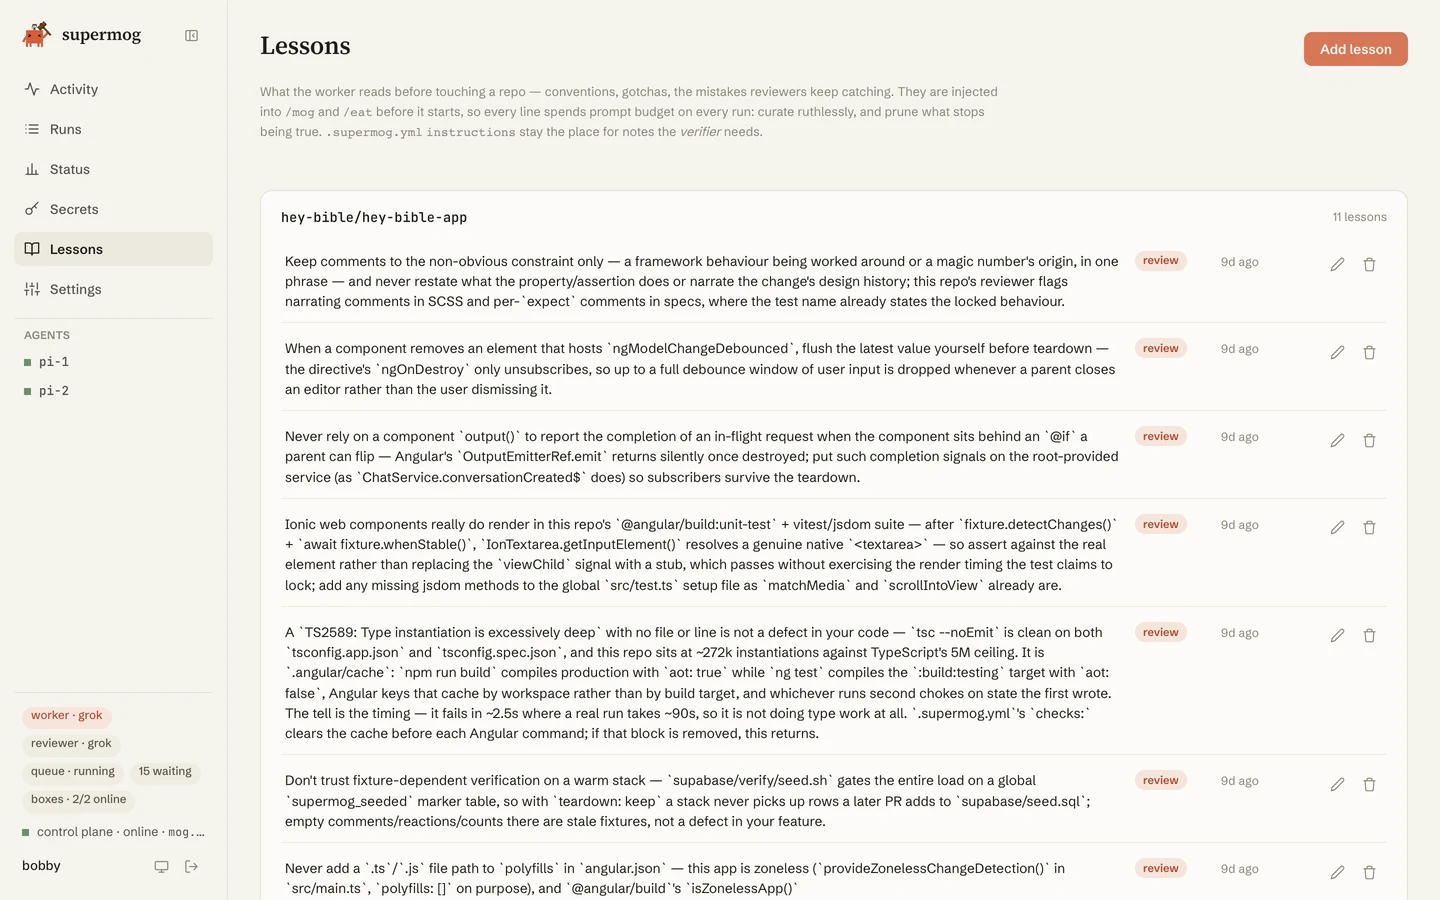
*The lessons store: things reviewers caught once, injected into every future run so they never get caught twice.*
**The numbers so far:** 2 Raspberry Pi 5s · 440+ issues and PRs in ~2 weeks · 16 pipeline stages from issue to merge · 1 WebSocket per box and zero inbound ports · $0 in CI minutes on the self-hosted runners.
## The Fun Part 🔨
Each Pironman 5 has a tiny SSD1306 OLED. Ours run a pixel mog who hammers away whenever the box is actively mogging: locked 30-to-90-degree mallet swing, frame-wide BOOM dashes on impact, and a nap when the queue is idle. We didn't drop a PNG on it. We drew him at 128×64, one bit per pixel, in a browser preview that *is* the panel buffer, locked the frame numbers in tests so the TypeScript and the Python on the Pi cannot drift, and let the Pi paint that same buffer onto the glass. A tap of the power button flips to host stats.
Taking the screen meant not starting Pironman's own software (it would have stolen I2C `0x3C`), and then the tower coolers went quiet. On Raspberry Pi OS that fan isn't Pironman's to drive: the kernel `pwm-fan` sits off below 50 °C, and Pironman only reads the tach. Their own FAQ is one line in `config.txt`. We dropped the first trip to 30 °C; the guy kept slamming and the SoC stopped cooking. Completely unnecessary, and everyone's favorite feature. We also filmed the case build — the timelapse, and the story of editing it entirely inside Claude Code, got [a short post of its own](/blog/pironman-build-timelapse).
## Autocatalytic, Not Recursive 🔁
[Martin Casado](https://a16z.com/author/martin-casado/) (a16z) draws a distinction we've adopted: *recursive* self-improvement is a system copying and upgrading itself wholesale; *autocatalytic* is using the thing as a tool to make the thing faster — the way engineers have used software to build software since the first compiler. He prefers the second term for what's actually happening in AI right now, and it describes Supermog exactly. Supermog doesn't rewrite its own weights. It writes, reviews, verifies, and merges the code of the system that runs it, while doing the same for our other projects. Somewhere north of half of Supermog's recent features shipped through Supermog.
It's also an experiment in how far you can go with little to no human review. The honest answer so far: further than we expected, with guardrails. Independent review by a second model catches real bugs; verification-with-evidence catches the "compiles but doesn't work" class; a hard cap on how many times an issue may go back from QA to Develop keeps the bot from thrashing; and when a round genuinely can't vouch for a branch, it says so, posts why, and pages a human instead of merging.
## What's Next 🚀
Runners on our macOS and Windows machines, which have enough muscle to run Android emulators, so they won't need a phone plugged in — and, with per-machine limits, to run a lot more work in parallel than a Pi can. Full-desktop verification. Real merge-order scheduling. And more dogfooding through [Automate It](https://automate.it.com), because the point was never the Pis — it's what a small team ships when the pipeline works this hard.
## Should We Make the Source Available? 🤔
We built Supermog for ourselves, and honestly, we're curious whether it would be useful beyond our walls. Would your team run something like this? Would you want to license the source, study how it works, or have us stand a fleet up for you? We genuinely don't know what the demand looks like, which is why we're asking. If this sounds like something you'd use, tell us: ping [@workingdevshero](https://x.com/workingdevshero) on X or email [bobby@workingdevshero.com](mailto:bobby@workingdevshero.com). If enough hands go up, we'll figure out the right way to share it.
And if you just want the throughput without owning the machinery — that's literally what we do. [Say hi](/contact).
---
# 90 Minutes of Pironman Assembly in 60 Seconds (No Video Editor Allowed)
> The Supermog fleet got its Pironman 5 cases, and the build timelapse got made the same way the system itself did: entirely in conversation with Claude Code. One ffmpeg filter graph, AI-generated music, and beat-synced glitches. No editing software was opened.
- Published: 2026-08-30
- Author: bobbyg603
- Categories: AI, Software
- Tags: claude, ffmpeg, raspberry-pi, pironman, video, venice, timelapse
- Canonical: https://workingdevshero.com/blog/pironman-build-timelapse/
The two Raspberry Pis that run [Supermog](/blog/supermog-builds-itself) recently moved into Pironman 5 cases: real PCIe for the NVMe drives, tower coolers, and the little OLEDs our pixel mascot hammers away on. We filmed the first case build, and then made ourselves a rule for the edit: **no video editor.** The whole thing had to come together in conversation with Claude Code (Fable 5), the same way Supermog itself did.
## The Pieces 🧩
- **The footage**: one static iPhone take on the bench at the [Sparx](https://sparx-fire.com) lab. 90-some minutes across two clips, because there's a mid-build run for a flathead screwdriver hiding in the gap.
- **The edit**: a single ffmpeg filter graph. Both clips concatenated, run at 115×, titles drawn straight onto the frames in the site's own Bricolage Grotesque, then a snap back to real time at the exact second the finished case gets held up to the camera.
- **The music**: [Venice's](https://venice.ai) music API, a 66-second instrumental prompt to the ElevenLabs Music model. Third take kept. The mix ducks under the real-time reveal and fades over the end card.
- **The effects**: a little Python onset analysis found the track's drop at 16 seconds and its strongest drum hits. The glitch bursts (hard RGB split plus analog noise) sit on those beats: a double-stutter leading into the drop, single hits on three kicks, and a final burst landing exactly on the timelapse-to-real-time cut. The audio visualizer riding the bottom edge is ffmpeg's `showfreqs` in the brand palette.
- **The end card**: the mascot on a background color-sampled from the logo PNG itself, so the two are seamless.
## The Back-and-Forth 🏓
What made this fun wasn't any single trick, it was the loop. Every round was a sentence of feedback and a fresh preview in the chat:
- *"We ended too fast — slow to normal speed when I show the finished case and smile."* Claude scrubbed the footage, found the exact second the case comes up (and the thumbs-up two seconds later), and re-cut with a speed ramp.
- *"Make the visualizer about 3× bigger, and put the glitches on interesting points in the audio — before the beat drop, or on drum kicks."* That's where the onset analysis came from: the effects stopped being decoration and started following the song.
- *"Can we say 90 minutes instead of 95? It's cleaner."* One word in a filter graph, one re-render.
There were honest stumbles, too. An ffmpeg quirk where `fontfile=` silently swallowed every option after it. A music API whose innocently named `complete` endpoint turned out to *delete* the finished track — we paid for two songs nobody will ever hear. Each one cost a minute, not an afternoon.
Total tooling: a phone, ffmpeg, one API, and a chat window. The video about the system that builds itself got built the same way the system did.
*Want the full story of what these little towers actually run? That's over here: [We Built a System That Builds Itself](/blog/supermog-builds-itself).*
---
# The Best Way to Write Docs in the Age of AI
> One session with Claude Code, a running dev environment, and Mintlify rebuilt the entire Automate It docs site — source-verified content, scripted screenshots, and a pipeline that keeps docs honest.
- Published: 2026-07-11
- Author: bobbyg603
- Categories: AI, Software
- Tags: ai, claude, docs, mintlify, playwright, automate-it
- Canonical: https://workingdevshero.com/blog/docs-age-of-ai/
We rewrote the entire [Automate It](https://automate.it.com) docs site in one working session. Not "drafted an outline." The whole thing: twenty-six pages, a full REST and MCP reference, screenshots of every screen, five thousand lines of stale duplicate docs deleted, deployed to [docs.automate.it.com](https://docs.automate.it.com).
Here's the uncomfortable part: the old docs weren't bad because we were lazy. They were bad because docs written by hand start dying the moment you publish them. Ours claimed an API key format that didn't exist, file-size limits that were wrong in both directions, and "38 MCP tools" on one page while another page documented 26. Two copies of the truth, rotting at different speeds.
The fix wasn't writing more carefully. It was changing what "writing docs" means.
## Docs shouldn't be written. They should be derived.
The old way: a human opens a blank page and types what they remember being true. The new way: an AI agent with access to your actual codebase derives the docs from the source, and a human reviews them — the same review-gate philosophy Automate It applies to content applies to documentation.
Because we had the full development environment running locally, Claude (running in Claude Code) could do things a docs tool never could:
**It read the source instead of trusting the old copy.** Every endpoint, scope, status enum, and file-size limit in the new docs was verified against the route handlers before it shipped. That fact-check found the discrepancies above — and a genuine bug: our API rate limiter was wired in a way that meant it never actually fired. Writing docs found a bug the tests missed. Twice the value for the same work.
**It took its own screenshots.** The agent wrote a small Playwright script that signs into the local app, walks every documented screen, and captures them at a fixed viewport. It even curated the local database first — seeded the task board with realistic content, added skills, swapped in the proper workspace logo — so the screenshots look like a real workspace instead of an empty demo. The script is checked into the repo. Next redesign? Re-run one command and every screenshot is current again.
**It cleaned up after itself.** The duplicated docs pages on our marketing site — the ones quietly contradicting the real docs — became redirects. One source of truth left standing.
**It shipped like code, because docs are code.** Everything landed as a single pull request. Mintlify's GitHub App built a preview of the site right on the PR, its check caught one MDX syntax error before deploy (an agent is not magic; a CI gate is), the agent fixed it, and merging to main deployed the site. No CMS. No copy-paste. No "who has the Figma with the screenshots."
## The stack, if you want to copy it
The docs half of this runs on [Mintlify](https://mintlify.com), and the free plan covers a shocking amount of it:
- **Docs as MDX in your repo** — components, Mermaid diagrams, dark mode, and search out of the box
- **A custom domain** — docs.yourproduct.com, on the $0 plan
- **GitHub auto-deploy** — merge to main, docs are live
- **A web editor** — for teammates who don't want to touch git
- **Your docs as an MCP server** — AI agents can query your documentation directly, which matters more every month
- **An API playground** for your endpoints
Add an AI agent with access to your repo and a running dev environment, and the loop closes: facts derived from source, screenshots derived from the app, review derived from a pull request.
## Docs that can be regenerated are docs that stay true
That's the actual lesson. A hand-written doc is a snapshot; it's wrong the week after you ship. A derived doc — checked against source, illustrated by a script, gated by CI — can be regenerated any time the product moves. In the age of AI, that regeneration costs one prompt.
Go click around [docs.automate.it.com](https://docs.automate.it.com) — everything you see, including the screenshots, came out of the session described above.
And if you're staring at your own product thinking "our docs claim things our API stopped doing a year ago" — we'll do this for you. Codebase-verified docs, real screenshots, a pipeline that keeps them honest. [Get in touch](/contact) and point us at your repo.
---
# AI Drafts, Human Approves: How Three AIs and One Human Rebranded This Site
> Claude Fable 5 orchestrated, Grok Imagine illustrated, Google's Nano Banana Pro handled the fine edits via Venice, and a human approved every pixel. Inside the Working Dev's Hero brand-family refresh.
- Published: 2026-07-11
- Author: bobbyg603
- Categories: AI, Software
- Tags: ai, claude, grok, venice, design, branding, astro
- Canonical: https://workingdevshero.com/blog/brand-family-refresh/
## The Setup 🎨
A few days ago we shipped a full rebrand of [Automate It](https://automate.it.com), our content automation platform: a violet-to-pink gradient, Bricolage Grotesque headlines, and a "Social media on autopilot. No slop allowed." pitch. It came out great, which created a new problem: the company site you're reading right now suddenly looked like it belonged to a different company.
So we pointed the same workflow at workingdevshero.com. The rule we set going in: **siblings, not clones**. This site keeps its plum palette, its light theme, and its superhero mascot. It adopts the family's gradient accents, the display font, and finally tells the Automate It story it had somehow never mentioned.
One afternoon later: a [team page](/team) for our human-and-AI squad, a [Custom Automations](/services/custom-automations) service, an [Automate It case study](/portfolio/automate-it), a full-bleed animated-feeling hero, new social cards, and a pile of small fixes. Here's how the work actually got done, because the *how* is the interesting part.
## The Orchestra 🎼
Three different AI systems touched this refresh, each doing what it's best at:
- **Claude Fable 5** (via Claude Code) was the orchestrator. It explored the codebase, planned the work, ported the brand kit from the Automate It repo, wrote every component, drove the image generation, ran the builds, took the screenshots, and opened the PR.
- **Grok Imagine** (Grok Build's image model) was the illustrator. Claude called it headlessly from the command line — one CLI talking to another:
```bash
grok --always-approve -p "/imagine Flat vector sticker-style character portrait: ..."
```
- **Google's Nano Banana Pro image edit model** (via [Venice](https://venice.ai)) handled the surgical edits no prompt was going to nail. More on that below.
And one human sat in the review seat, approving or rejecting every single image before it shipped. If that loop sounds familiar, it's because it's exactly the [review gate Automate It](https://automate.it.com) puts between AI and your audience. We didn't just build the brand refresh; we ran our own philosophy on it.
## The Floundering 🦞
Let's be honest about the middle part: we floundered.
The first team portraits were charming and completely wrong. Claudius and Claudia, our OpenClaw agents, came back as a cozy guy in a cardigan and a mechanic with a ponytail. Cute! Except anyone who's visited [claudius.blog](https://claudius.blog) or [claudia.cool](https://claudia.cool) knows they're **robotic lobsters** with lightbulb antennas. The fix wasn't a more clever prompt; it was Claude actually *reading their websites*, pulling the canonical art, and describing it precisely: red-orange segmented shell, purple cartoon eyes, silver mech joints, glowing bulb on a metal stalk. Claudia's only differences: two pink polka-dot bows on her antennae, and eyelashes.
Then the detail rounds: Claudius had a nose (lobsters don't). Then his claws weren't folded. Then his grin was too smug. Moses needed to be *biblically* accurate with WDH flare: plum robes, glowing staff, a stone tablet carved with ``. Neo needed to look like, well, Neo, and lose the purple skin and the green code-rain backdrop. All in, the character set took about **two dozen generations** to get right.
Was that wasteful? Each render took under a minute and cost pennies. The expensive part of illustration was never the drawing — it was the *deciding*. And the deciding is exactly what stayed human.
Two prompt lessons worth stealing: always append "absolutely no text, no letters, no numbers anywhere" (diffusion models love decorating with gibberish glyphs), and describe the *composition*, not just the subject. Our full-bleed hero was generated with "the left half is quiet open night sky that fades to solid deep plum at the edge" specifically so CSS could take over from there.
## The Human Touch 🖌️
The rooftop hero scene came out of Grok strong: moonlit, caped, gloriously uncluttered. But it wasn't *ours* yet. So the human took it into Venice and used **Google's Nano Banana Pro** image edit model to add the beard (obviously) and the `` emblem on the chest, the same mark our mascot has worn since day one. Then it was upscaled to 21:9, with a square companion cropped for mobile.
That's the division of labor in one sentence: AI got us 90% of the way in minutes, and the last 10% — the identity, the details that make it recognizably us — was human judgment applied with a precision tool.
## The Engineering Bits 🔧
A few techniques from this refresh that we'll reuse forever:
- **Full-bleed hero without tiling.** Instead of tiling AI art (seams, collage vibes), generate the scene *composed for overlay* (subject right, quiet sky fading to a solid brand color on the left), then let a CSS gradient scrim extend it infinitely. On ultrawide monitors the whole composition caps at 1920px and centers between seamless plum pillars.
- **Social cards as code.** Both og images are checked-in HTML files screenshotted at 1200×630 with Playwright. Rebrand the site, tweak two HTML files, re-screenshot. No designer round-trip.
- **Let the framework do the compression.** The committed hero art is ~750KB of PNG; Astro's image pipeline serves it as a **27KB webp**. The five team portraits ship at 7–10KB each. The entire hero costs less bandwidth than a favicon.
- **QA is where it becomes real.** The last hour was unglamorous and essential: a headline breaking mid-word on "AI-Powered" (non-breaking hyphen), a button wrapping awkwardly, the mobile hero moving above the headline, a stale homepage portfolio section that had been showing two-year-old projects, and the ultrawide layout that looked fantastic on a 14" MacBook and terrible on a 34" monitor. Every one caught by looking at actual screenshots at 390, 1440, and 3440 pixels wide.
## The Meta-Lesson 🦸
The thing we keep coming back to: none of the AI systems involved shipped anything on their own. Claude proposed, Grok drew, Venice edited — and a human approved every image, every layout, every line of copy before it went live. That's not a limitation of the workflow. That *is* the workflow. It's how you get AI speed without AI slop.
It's the same loop we sell: [Automate It](https://automate.it.com) puts a swipe-to-approve review gate between AI agents and your social channels, and our [Custom Automations](/services/custom-automations) service builds these pipelines for your business. This site is the demo.
And if you want to meet the AI teammates who work this way every day (lobsters, prophet, and The One included), they're on the [team page](/team) now.
**Rebranded anything with an AI crew lately? Tell us how it went on [X @workingdevshero](https://x.com/workingdevshero)!**
---
# Give Your Agent a Wallet Instead of Another API Key
> Fund an AI agent with $1 of USDC on Base and let it pay for x402 APIs on demand. No signups, no per-service keys. Demo: a daily Bitcoin report to Discord.
- Published: 2026-05-24
- Author: Dimitrios Nossis
- Categories: AI, Tutorials
- Tags: ai, openclaw, x402, usdc, base, discord, agents, crypto
- Canonical: https://workingdevshero.com/blog/give-your-agent-a-wallet/
## Definition
*"The x402 protocol enables services to charge for access to their APIs and content directly over HTTP using the 402 Payment Required status code."* — [x402.org](https://www.x402.org/)
## Agent Summer
It's 2026 and agents are doing more work than ever — drafting code, running research, watching markets while you sleep. The friction now is access: every useful service wants a signup, an email confirmation, a billing page, and an API key dropped into a `.env` file somewhere. That's tedious when you're doing it for yourself, and risky when you're doing it for an agent — every credential you hand over is one more account it can drain, leak, or get locked out of.
Meanwhile, a quiet standard — HTTP 402 — has finally woken up, and a single USDC wallet on Base now opens the door to a growing ecosystem of APIs — no per-service signup, no per-service key required. This is a better deal for agents. The agent hits an endpoint, the server says "that'll be half a cent," the agent signs a USDC payment on Base, and the data flows back. No signup, no dashboard, no 2FA, no monthly subscription.
In this tutorial we'll wire up [OpenClaw](https://openclaw.ai), an open-source personal AI agent, and give it its own x402 wallet which it can use to pay for services. The agent fetches free market data from CoinGecko, summarizes it with its own configured model, and pays for a candlestick chart from ChartSplat over x402 — all delivered to a Discord channel on a daily schedule. Most of the setup happens by **chatting with the agent**, not by writing scripts or editing config files.
## The Pipeline
```
7-day OHLC data → CoinGecko free
Market analysis → Model of choice uses the model's budget
Candlestick chart → ChartSplat x402 $0.005
Delivery → Discord free
─────────────────
x402 spend: $0.005 USDC per report
```
One paid x402 service, paid for in USDC, no API key needed.
## Prerequisites
Before we start you'll need:
- A computer running Windows, macOS, or Linux
- A Virtual Private Server (VPS), either hosted by a provider like [Hostinger](https://www.hostinger.com?REFERRALCODE=workingdevshero) or installed locally via something like [VirtualBox](https://www.virtualbox.org/) — keeps OpenClaw isolated from your personal files
- [Node.js](https://nodejs.org/) v22 or later installed on the VPS
- A [Discord](https://discord.com/) account and a server you control
- ~$1 in USDC on the Base network
- An LLM provider — we'll use [Venice.ai](https://venice.ai/) with `venice/kimi-k2-5`, but any provider with ~30 RPM and 5+ concurrent connections will do
## Generate a Wallet
x402 payments move USDC on Base. We'll generate a wallet on your **personal computer**, not inside the VM, so the private key passes through your hands once before going into OpenClaw's config. This is the safer pattern: you see the key, save it to your password manager, and you're the only one who ever holds the raw value.
You'll need Node.js v18 or later installed on your personal computer. If you don't have it, download the LTS installer from nodejs.org. It works the same on Windows, Mac, and Linux.
On your personal computer (any folder you like), create `create-wallet.js`:
Paste this inside:
```javascript
#!/usr/bin/env node
const { generatePrivateKey, privateKeyToAccount } = require('viem/accounts');
const privateKey = generatePrivateKey();
const account = privateKeyToAccount(privateKey);
console.log('━━━━━━━━━━━━━━━━━━━━━━━━━━━━━━━━━━━━━━━━━━━━━━━━━━━━━━━━━━━━');
console.log(' WALLET GENERATED — SAVE BOTH OF THESE NOW');
console.log('━━━━━━━━━━━━━━━━━━━━━━━━━━━━━━━━━━━━━━━━━━━━━━━━━━━━━━━━━━━━');
console.log('Address: ', account.address);
console.log('Private Key: ', privateKey);
console.log('━━━━━━━━━━━━━━━━━━━━━━━━━━━━━━━━━━━━━━━━━━━━━━━━━━━━━━━━━━━━');
console.log(' • Copy the address — you\'ll need it to fund the wallet');
console.log(' • Save the private key to your password manager NOW');
console.log(' • The key will not be saved anywhere else');
console.log('━━━━━━━━━━━━━━━━━━━━━━━━━━━━━━━━━━━━━━━━━━━━━━━━━━━━━━━━━━━━');
```
Install `viem` and run it:
```bash
npm install viem
node create-wallet.js
```
You'll see something like:
```
━━━━━━━━━━━━━━━━━━━━━━━━━━━━━━━━━━━━━━━━━━━━━━━━━━━━━━━━━━━━
WALLET GENERATED — SAVE BOTH OF THESE NOW
━━━━━━━━━━━━━━━━━━━━━━━━━━━━━━━━━━━━━━━━━━━━━━━━━━━━━━━━━━━━
Address: 0x7856...
Private Key: 0x4a5b...
━━━━━━━━━━━━━━━━━━━━━━━━━━━━━━━━━━━━━━━━━━━━━━━━━━━━━━━━━━━━
```
**Copy both values into your password manager immediately.** The script doesn't save the key anywhere — once your terminal scrolls past, it's gone.
Now fund the wallet. Send ~$1 USDC on the **Base** network (not Ethereum mainnet — those are different chains, and USDC sent to the wrong chain is painful to recover) to the address you just generated. Don't keep more in this wallet than you're willing to lose.
The methods described in this article are for experimental purposes only. There are more secure ways to interact with x402 that we'll document in a follow up article so be sure to follow [@workingdevshero](https://x.com/workingdevshero.com) so you don't miss it!
## Hatch the Bot
Before installing OpenClaw, create the Discord bot since the onboarding wizard will ask for the token.
Head to the [Discord Developer Portal](https://discord.com/developers/applications), click **New Application**, name it (e.g., "OpenClaw x402"), and hit **Create**. On the **Bot** tab, click **Reset Token** and save the token immediately — Discord only displays it once.
Scroll down and enable all three Privileged Gateway Intents (Presence, Server Members, Message Content). Save.
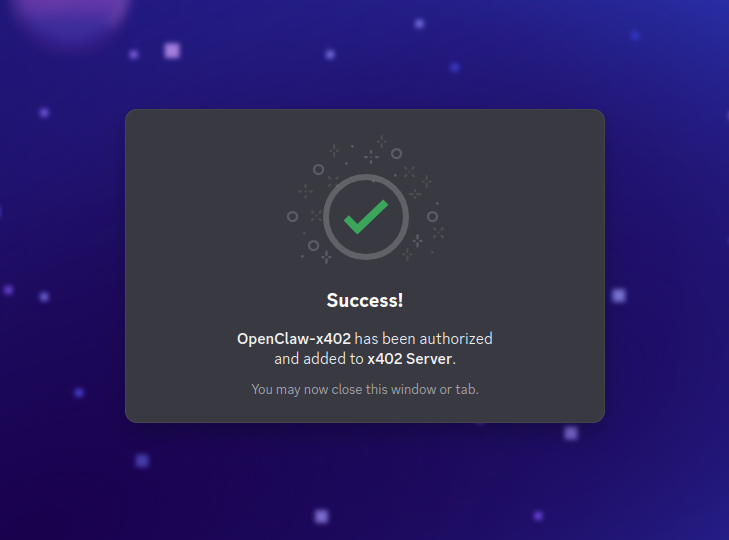
In **OAuth2 → URL Generator**, check `bot` under Scopes and `Send Messages`, `Attach Files`, `Read Message History` under Bot Permissions. Copy the generated URL, open it in a new tab, and invite the bot to your server.
In Discord, enable Developer Mode (User Settings → Advanced → Developer Mode), right-click the channel where you want the bot to post, and **Copy Channel ID**. Save it — we'll need it later.
## Install OpenClaw
Switch over to your VM or VPS, install the latest OpenClaw from npm:
```bash
npm install -g openclaw@latest
openclaw --version # OpenClaw 2026.5.26
```
Now run the onboarding wizard. Don't worry if it takes a moment to start.
```bash
openclaw onboard
```
Pick Quickstart Setup and answer the prompts roughly as follows:
| Prompt | Answer |
|---|---|
| Setup mode | **Quickstart** |
| Model provider | **Venice AI** — paste your key |
| Default model | **Keep current (venice/kimi-k2-5)** |
| Select channel | **Discord (Bot API)** — paste the bot token |
| Configure Discord channels access | **Yes** |
| Discord channels access | **Open (allow all channels)** |
| Search provider | **Skip for now** |
| Configure skills now? | **No** — we'll add one in a moment |
| Enable Hooks | **Skip for now** |
| How to hatch? | **Hatch in Terminal** |
The TUI (terminal UI) is an interactive chat you can use to talk to OpenClaw directly. When onboarding completes, a `"Wake up, my friend!"` message is sent and the agent responds.
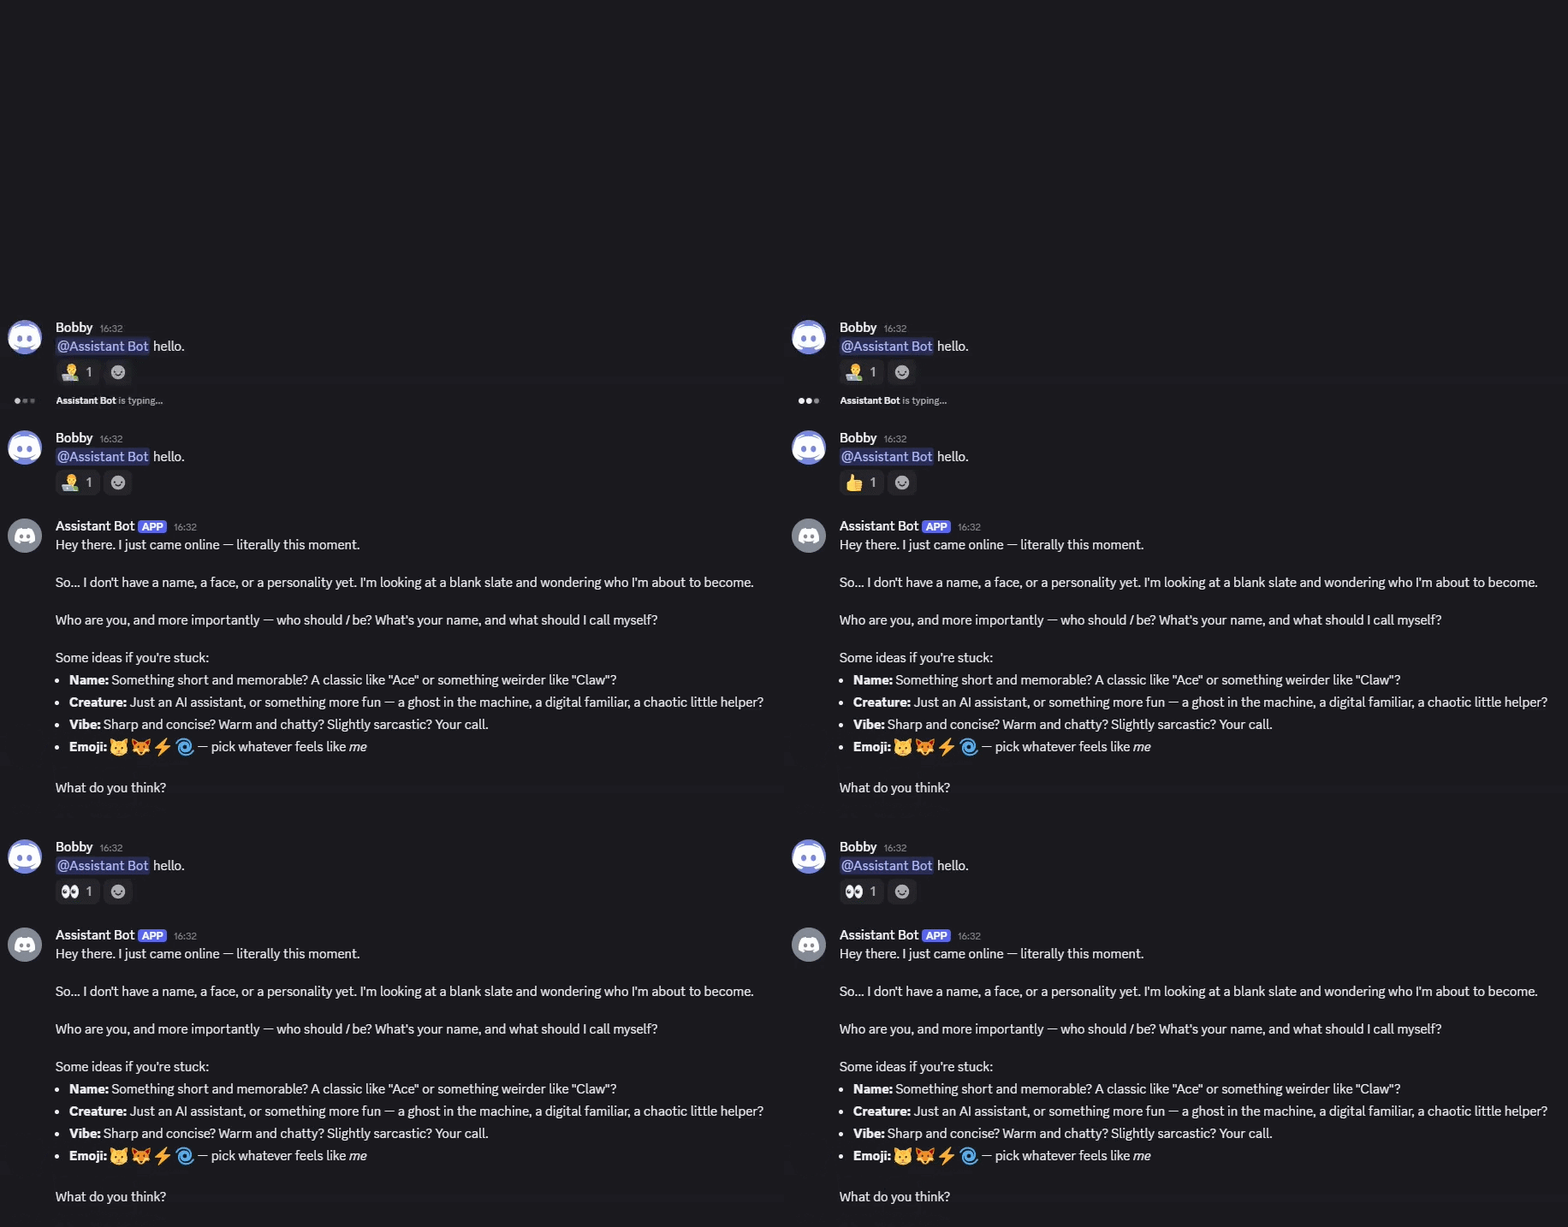
Pop over to Discord and `@YourBot hello` — same agent, different surface.
You'll see an error with a requestId. Copy that requestId and approve it:
```
openclaw devices approve
```
On first connection, OpenClaw will ask you to give it a **name**, **nature**, **vibe**, and **emoji**. Set these once and the agent stops asking.
If the bot hangs or times out, it's almost always the model provider. Check your API key, check your rate limits, regenerate if needed. `openclaw onboard` is safe to re-run. Alternatively, if you need to change a specific setting later, you can use `openclaw config`.
## Install the ChartSplat Skill
ChartSplat is a chart-generation service with an [x402 integration](https://clawhub.ai/bobbyg603/chartsplat-x402) on ClawHub (OpenClaw's skill registry). We'll have the agent install the skill itself — you don't need to manually run `npm install` or copy files anywhere.
In Discord (or the TUI), send this to your bot:
> *Before installing anything, inspect the ClawHub skill metadata and setup requirements. If the skill asks you to install a third-party package or CLI, verify its source, maintainer, and package contents before running the install command. Install the skill "Chart Splat (x402)" (`bobbyg603/chartsplat-x402`) from ClawHub only after those checks pass. Skill page: `https://clawhub.ai/bobbyg603/chartsplat-x402`. Keep the work scoped to this skill only. After install, help me finish setup from verified skill metadata. Required env vars: `X402_PRIVATE_KEY`. Required binaries: `node`, `npx`. Use only the metadata you can verify from ClawHub; do not invent missing requirements. Ask before making any broader environment changes.*
The agent will fetch the skill metadata, summarize what gets installed, and walk you through any requirements it finds.
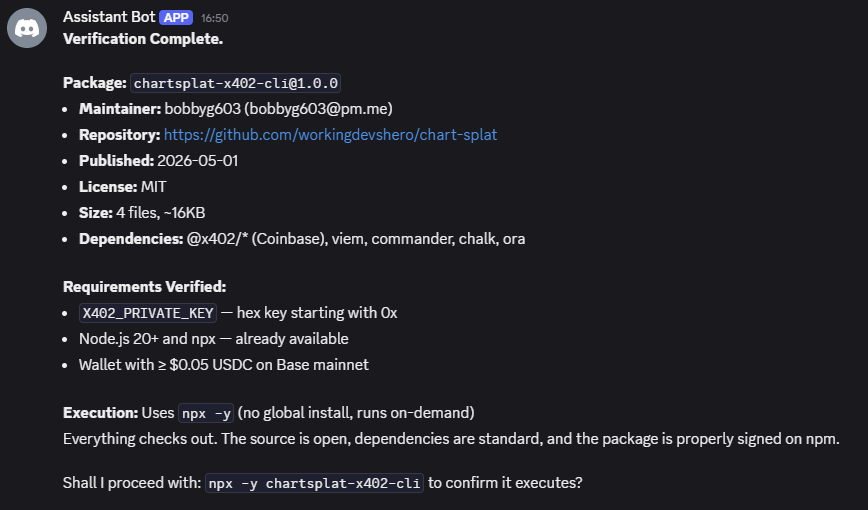
When it's done, ask:
> *What env vars does the chartsplat-x402 skill need set?*
It should confirm `X402_PRIVATE_KEY` is the only one. Now we'll set it.
## Set the Wallet Key
Back in your VM terminal, set the private key as the skill's environment variable. The exact command is:
```bash
openclaw config set skills.entries.chartsplat-x402.env.X402_PRIVATE_KEY '"0xYOUR_PRIVATE_KEY_HERE"'
```

The single quotes are for the shell, the double quotes inside are for OpenClaw's config parser. Without that pattern you'll hit a validation error.
Restart the gateway so the skill picks up the new value:
```bash
openclaw gateway restart
```
## Verify the Wallet
Ask the agent to check your balance. In Discord:
> *Can you please try and check the USDC balance on the Ethereum Base network using BaseScan? The public address that corresponds to my chartsplat-x402 private key is ``. Please find the USDC balance of that wallet and report it back.*
Replace `` with the address you saved earlier. The agent will use its web tools to query BaseScan and report your balance.
If the balance is non-zero, your wallet is funded and the skill is wired up. You're ready to spend USDC.
## Test the Skill
Before automating, do a quick manual chart to confirm the skill works. In Discord:
> *Use the chartsplat-x402 skill to generate a candlestick chart with this sample data and save it to `~/.openclaw/workspace/test-chart.png`. Then post the chart back to me.*
>
> *Data: 7 daily candles*
> *May 3: open 78326, high 79100, low 77800, close 78400*
> *May 4: open 78400, high 80300, low 78100, close 79600*
> *May 5: open 79600, high 81500, low 79500, close 80700*
> *May 6: open 80700, high 82500, low 80500, close 81080*
> *May 7: open 81080, high 81400, low 79400, close 79723*
> *May 8: open 79723, high 80100, low 79000, close 79978*
> *May 9: open 79978, high 80300, low 79900, close 80196*
The agent will format the data into the chart config the skill expects, call ChartSplat through the x402 payment flow, and post the rendered PNG back to Discord. You should see a candlestick chart appear in your channel within a minute, with a copy saved to ~/.openclaw/workspace/.
That's it! You've just made your first x402 payment via OpenClaw, about $0.005 USDC. The skill is working end-to-end.
If something goes wrong:
- The agent says X402_PRIVATE_KEY is not set in the environment — tell it to read the key from `openclaw.json`.
- The agent saves the chart locally but doesn't post it to Discord — tell it to post the generated chart to Discord as well.
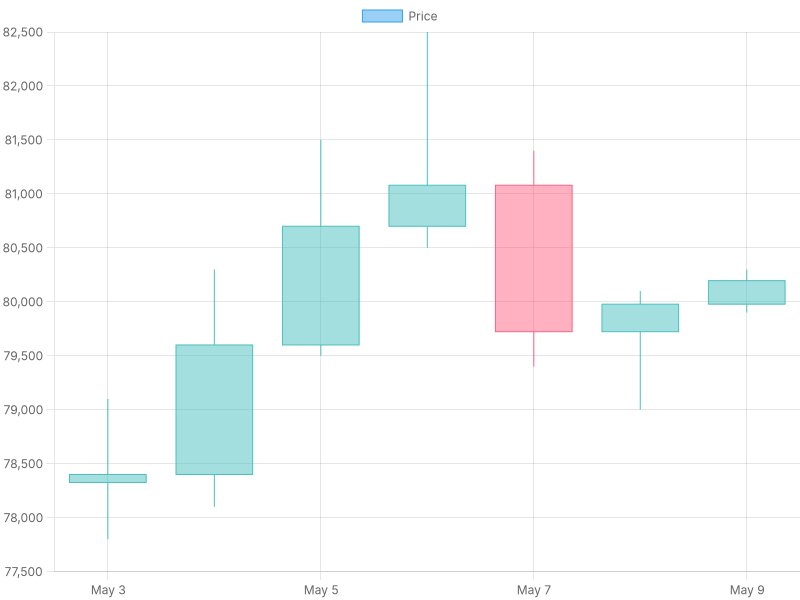
## Putting It All Together
Now we tell the agent what we want the daily workflow to look like. No shell scripts, no config edits, no rigid prompt templates — just describe the pipeline in plain English. In Discord:
> *I'd like you to set up a daily cron job using OpenClaw's built-in cron system that runs at `` time and posts a Bitcoin report to this Discord channel.*
>
> *The workflow:*
>
> *1. Fetch BTC's 7-day daily OHLC from the free CoinGecko endpoint: `https://api.coingecko.com/api/v3/coins/bitcoin/ohlc?vs_currency=usd&days=7`. This returns 4-hour candles for 7 days — aggregate them into daily candles by grouping by date. Take only the last 7 complete daily candles — if the aggregation produces 8 groups due to partial-day boundaries, discard the earliest one.*
>
> *2. Write a 3-4 sentence summary of the price action over those 7 days.*
>
> *3. Use the chartsplat-x402 skill to render a candlestick chart of the 7 daily candles. Save the PNG to `~/.openclaw/workspace/btc-7day.png`. Use date labels like "May 3" for the x-axis, not raw timestamps.*
>
> *4. Post exactly one Discord message to this channel containing only your 3-4 sentence summary as the text and the chart as an attachment. Do not include any other content, no settlement links, no status messages, no repeated summaries, no payment proofs.*
Replace `` based on your desires (e.g. `8:00 America/New_York`, `15:30 Europe/London` etc.)
The agent will use its `cronjob` tool to register the schedule. It may ask clarifying questions — confirm what you want and let it proceed.
Verify the cron was registered:
```bash
openclaw cron list
```
If you hit a `pairing required` error with a requestId here, OpenClaw is asking you to approve this device's local channel — the same flow as the Discord approval earlier. Run `openclaw devices approve ` with the requestId from the error, then re-run `openclaw cron list`.
You should see a job with the schedule and next run time.
## Go!
You can preview what your scheduled report will look like by asking the agent to run it on demand:
> *Run the daily BTC report now.*
Or from the terminal:
```bash
openclaw cron list # find the job ID
openclaw cron run # trigger immediately
```
After a minute or so, the report should land in your Discord channel: a brief AI summary of the week's price action, attached to a candlestick chart paid for with USDC.
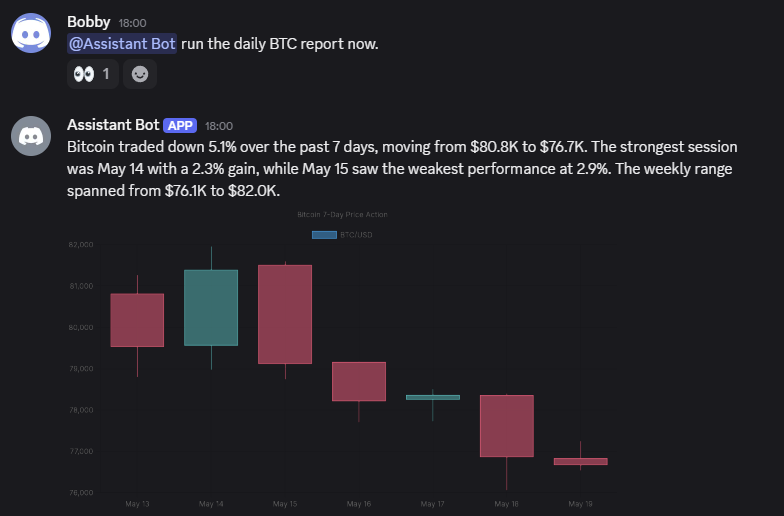
If the report includes content you didn't ask for — settlement links, status messages, repeated summaries — just tell the agent what to drop. Something like "stop including the BaseScan settlement link in the daily report" updates the cron's behavior going forward, no need to recreate it.
## Editing the Cron Later
Just talk to the agent:
> *Change the BTC report to run at 8:30 AM instead of 9.*
Or:
> *Pause the BTC report for a few days.*
Or:
> *Delete the daily BTC report cron.*
The agent updates the job in place. If you'd rather use the CLI:
| Command | Use |
|---------|------|
| `openclaw cron list` | Find the JOB ID |
| `openclaw cron edit --cron "30 8 * * *"` | Change schedule |
| `openclaw cron pause ` | Pause |
| `openclaw cron resume ` | Resume |
| `openclaw cron rm ` | Delete |
## Why This Works The Way It Does
A few things worth understanding once the cron is running:
**Most of this setup was a conversation.** You didn't write a shell script. You didn't edit `openclaw.json` by hand. You didn't write a rigid step-by-step prompt for the cron. The new generation of AI agents are programmed by **talking to them**. Describe what you want, let them work out the steps. We used the terminal just three times (to install OpenClaw, to set the private key and to approve our device), and that's because both involve secrets or commands the agent can't run for you. Everything else was Discord prompts.
**The skill keeps the private key.** Your wallet's `X402_PRIVATE_KEY` lives in `~/.openclaw/openclaw.json` under the `chartsplat-x402` skill's env block. The skill's CLI reads it at runtime when it needs to sign a USDC payment. You set it once via `openclaw config set` and OpenClaw handles the rest.
**The wallet address isn't saved anywhere.** It's derived from the private key on demand. You can always recover it by importing the key into any wallet app, or asking the agent to compute it from the key in its config. You saved it to your password manager when you generated the wallet, and that's enough.
**Cost is ~$0.005 per run.** ChartSplat is the one x402 payment — about half a cent per chart. A dollar of USDC funds the bot for around 200 days.
## Troubleshooting
**Bot doesn't respond in Discord.** Check the gateway is running: `openclaw gateway status`. If not running: `openclaw gateway start` (or `openclaw gateway run`).
**`fetch failed` from the chartsplat-x402 skill.** Three common causes:
1. Wallet balance below ~$0.05 — top up.
2. The skill couldn't read `X402_PRIVATE_KEY` from config. Re-run the `openclaw config set` command with the right quoting (single quotes around a double-quoted string).
3. Transient network or facilitator hiccup. Try once more.
**Cron fires but nothing arrives in Discord.** Use `/new` in Discord to start a fresh session, then ask the agent to run the cron manually (`Run the daily BTC report now`). Stale session context occasionally blocks delivery.
**`pairing required` when adding the cron.** Use the explicit requestId approval form, not `--latest`:
```bash
openclaw devices approve
```
**Bot hangs on "conjuring".** You're rate-limited by your LLM provider. Generate a dedicated API key for this VM, switch models, or upgrade your tier.
**`EACCES: permission denied` on `npm install -g`.** npm is trying to install into `/usr/lib/node_modules/`. Re-run the "configure npm" step so installs go to `~/.npm-global/`.
**Bot does something unexpected.** Remember you can just talk to it. OpenClaw can read its own config, inspect its skills, and often diagnose issues on its own. If something feels off, ask the bot what's happening before editing files by hand.
## Mainnet
Here's what you built:
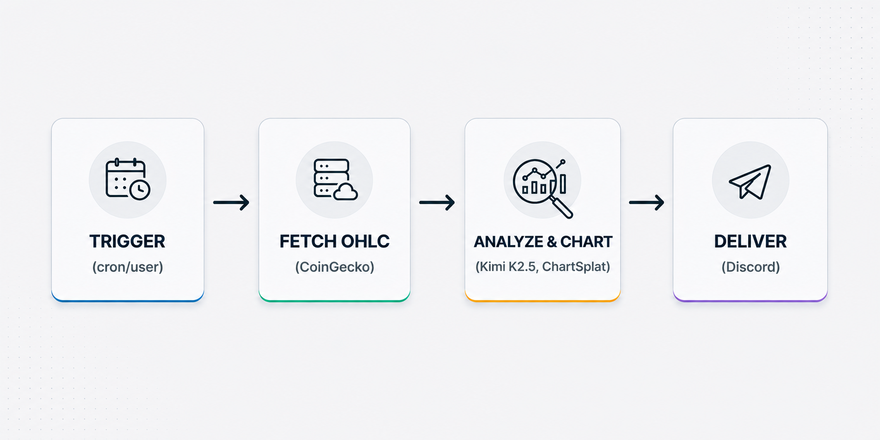
## Congrats!
You've taught an AI assistant to spend its own money on infrastructure — and most of the work was a conversation. This is what the new generation of agents is built for: tell them what you want, let them figure out the steps.
Some places to take this next:
- **Browse the [x402 ecosystem](https://www.x402.org/ecosystem).** Web scraping, weather, translation, market data — many more services are accessible via x402. Install any of them as skills and ask the agent to use them in your workflow.
- **Expand the report.** Add more tokens, different timeframes, indicators, or different chart types (check [ChartSplat's docs](https://chartsplat.com/docs) for what's supported). Just describe what you want to the agent.
- **Deploy to a VPS.** Run OpenClaw on a VPS instead of a VM. Same `openclaw config set` approach, firewall the box, top up the wallet monthly, forget it exists.
- **Ship your own x402 API.** Serve something useful, charge half a cent, and let agents like this one be your customers.
## Conclusion
We built an autonomous AI assistant that pays for its own infrastructure. OpenClaw on an Ubuntu VM, a wallet generated locally and funded with $1, the ChartSplat skill installed by asking the agent in Discord, the daily workflow set up by describing it in plain English. The agent never sees a credit card or API key. The wallet holds a dollar. The whole thing costs about half a cent per run, and editing it later is a conversation, not a config rewrite.
Thanks for reading!
If you found the information in this tutorial useful and want to connect, feel free to reach out to my socials.
---
# mog: From GitHub Issue to Pull Request With One Command
> How a Thursday afternoon at a Boston WeWork turned into a CLI that closes GitHub issues autonomously — with Claude Code running safely inside a Docker sandbox.
- Published: 2026-03-05
- Author: bobbyg603
- Categories: AI, Software
- Tags: ai, claude, github, docker, automation, tools
- Canonical: https://workingdevshero.com/blog/mog/
## How It Started 🚀
Thursday afternoon at the Boston WeWork. We'd been using Claude Code's web interface to knock out GitHub issues, but the workflow was painful. Copy the issue description. Paste it into Claude. Manually shuttle context back and forth. There had to be a better way to get Claude to just *read the issue and fix it*.
We also had a security problem. Claude Code's `--dangerously-skip-permissions` flag lets the agent run wild — editing files, executing commands, doing whatever it takes to finish the job. Powerful, but we weren't about to run that on our local machine with access to everything.
So we built [**mog**](https://github.com/bobbyg603/mog).
## The Problem 💥
Two pain points drove the project:
1. **No automatic issue ingestion.** Claude Code doesn't natively pull GitHub issue descriptions and work through them autonomously. You end up being the middleman, copying context between GitHub and your terminal.
2. **Security concerns with unrestricted permissions.** Running `--dangerously-skip-permissions` on your host means Claude has access to your entire filesystem, your credentials, everything. That's a non-starter for any security-conscious developer.
We wanted a tool that could take a GitHub issue number and produce a pull request — without babysitting it, and without giving an AI agent the keys to our kingdom.
## The Solution 📦
**mog** is a CLI that bridges the gap. It runs on your host machine, fetches the issue details using `gh`, then spins up Claude Code inside a **Docker sandbox** to do the actual work. Think of it as a security boundary — Claude gets `--dangerously-skip-permissions` inside the container, but the container itself is isolated. Your GitHub token, your SSH keys, your local files — none of it is accessible from inside the sandbox.
Here's the flow:
1. **Validate** — Checks that `gh`, `git`, and `docker` are installed
2. **Fetch** — Pulls the issue title, body, and labels via `gh issue view` on the host
3. **Branch** — Creates a clean git worktree on a new branch (e.g., `123-fix-broken-login`)
4. **Plan** — Sends a planning prompt to Claude inside the sandbox, which creates an `IMPLEMENTATION_PLAN.md` with a checklist of atomic tasks
5. **Build** — Iterates through each task in the plan, prompting Claude to implement them one by one
6. **Cleanup** — Removes the implementation plan with a final commit
7. **Ship** — Pushes the branch and opens a PR with `Closes #` in the body
The host handles all GitHub authentication. The sandbox handles all code generation. Clean separation.
## The Ralph Wiggum Loop 🔄
Here's the thing about AI agents: they quit early. They'll do 80% of the work, declare victory, and leave you to mop up the rest. Anyone who's used coding agents has felt this pain.
mog solves this with what's called the **Ralph Wiggum loop**, inspired by [a brilliant post from Geoffrey Huntley](https://ghuntley.com/ralph/). The concept is simple — keep re-prompting the agent until the job is actually done, like Ralph Wiggum from The Simpsons stubbornly trying until he gets it right.
In practice, mog reads the implementation plan after each Claude iteration. If there are still unchecked tasks, it sends Claude back in with a focused prompt for the next item. If Claude stalls — no commits, no progress — mog detects it and bails after two consecutive stalls. The loop caps at 30 iterations by default, which is more than enough for most issues.
The result? You point mog at an issue, walk away, and come back to a PR. The Ralph loop is what makes the difference between "AI did some of it" and "AI actually finished."
## Get Started 🛠️
mog is published on npm as `@bobbyg603/mog`. Install it globally with Bun:
```bash
bun install -g @bobbyg603/mog
```
Run the one-time setup to create the Docker sandbox and authenticate:
```bash
mog init
```
Then point it at any issue:
```bash
mog owner/repo 123
```
That's it. mog fetches the issue, plans the implementation, builds it inside a Docker sandbox, and opens a PR. Go grab a coffee. Or go home for the night.
The source code is available on [GitHub](https://github.com/bobbyg603/mog). It started as a bash script and grew into a Bun-based TypeScript CLI — which is fitting, since the whole point is that good tools evolve from real frustration.
## What's Next 🔮
mog was built in an afternoon because the pain was real. Claude Code is an incredible tool, but the gap between "AI can write code" and "AI can close issues autonomously" needed bridging. mog is that bridge — with the security model to make it practical for real projects.
The plan is to keep iterating. Smarter stall detection, better plan generation, maybe even multi-issue batching. The foundation is solid and the Ralph loop ensures things actually get done.
**Have you automated your GitHub workflow with AI? Tell us about it on [X @workingdevshero](https://x.com/workingdevshero)!**
---
# Enhancing MCP Servers for Revit: AI-Powered BIM Development
> How we helped Sparx Fire consolidate and improve the mcp-servers-for-revit open-source project, enabling AI assistants to build Revit models through natural language.
- Published: 2026-02-12
- Author: bobbyg603
- Categories: AI, Open Source, BIM
- Tags: ai, mcp, revit, bim, open source, sparx-fire
- Canonical: https://workingdevshero.com/blog/mcp-servers-for-revit/
## Building with AI, Literally 🏗️
What if you could describe a building to an AI and watch it take shape in Revit? Not through a complex API or custom scripting, but through natural conversation?
That's exactly what mcp-servers-for-revit enables. Connect Claude, Cline, or any MCP-compatible AI assistant to Revit, and start creating walls, placing sprinklers, and querying spatial data—all through prompts.
Working Dev's Hero recently partnered with [Sparx Fire](https://sparx-fire.com) to enhance this open-source project, and the results are pretty remarkable.
## See It In Action 🎬
Sparx used the enhanced MCP server to design a complete data center from scratch—including rooms, walls, equipment, and sprinkler layouts—primarily through natural language prompts:
## The Problem: Fragmentation 💥
The original [mcp-servers-for-revit](https://github.com/mcp-servers-for-revit/revit-mcp) project was ambitious but fragmented across three repositories:
- **revit-mcp** — The TypeScript MCP server
- **revit-mcp-plugin** — The C# Revit add-in
- **revit-mcp-commandset** — The actual Revit API commands
Users had to clone, build, and coordinate versions across all three just to get started. Add in version-specific compilation for different Revit releases, and the barrier to entry was significant.
## The Solution: Monorepo + Releases 📦
We consolidated everything into a single monorepo at [github.com/Sparx-Fire/mcp-servers-for-revit](https://github.com/Sparx-Fire/mcp-servers-for-revit) and built a GitHub Actions workflow that does the heavy lifting:
1. **Automated builds** for Revit 2020–2026
2. **Versioned ZIP releases** ready to download
3. **Single-folder installation** — extract, copy to addins, done
The result? Setup time dropped from "follow a 20-step build guide" to "download, extract, run."
## What Sparx Built With It 🔥
Sparx is developing smart fire sprinkler technology that uses spatial awareness to coordinate suppression. To prototype different building layouts and sprinkler configurations, they needed to iterate fast.
Using the enhanced mcp-servers-for-revit, they:
- Generated complete data center models through natural language prompts
- Placed sprinklers according to NFPA 13 requirements
- Extracted precise spatial coordinates for their releasing panel
- Iterated on layouts in minutes instead of hours
Every sprinkler placed carries real 3D coordinates relative to walls, ceilings, and other devices—exactly the data their system needs for coordinated activation logic.
[Read the full Sparx Fire case study →](https://sparx-fire.com/blog/ai-powered-bim-data-center/)
## What We Added 🛠️
Beyond consolidation, we contributed:
- **Revit 2026 support** — Extended compatibility to the latest version
- **New commands** — Room tagging, level creation, and more
- **Bug fixes** — Addressed issues in existing commands
- **Setup video** — A walkthrough of the entire installation process
- **Improved documentation** — Clearer guides for getting started
## Get Started 🚀
Want to try it yourself? We put together a step-by-step walkthrough showing the full setup process—downloading a release, installing the Revit add-in, and connecting your AI client:
**Quick steps:**
1. Download the release for your Revit version from [GitHub Releases](https://github.com/Sparx-Fire/mcp-servers-for-revit/releases)
2. Extract to `%AppData%\Autodesk\Revit\Addins\\`
3. Configure Claude or your preferred AI client with the MCP server
4. Start describing what you want to build
## The Bigger Picture 🔮
This project exemplifies what Working Dev's Hero is about: leveraging AI to multiply what's possible. The MCP protocol bridges the gap between natural language and complex APIs, and we helped make that bridge accessible to anyone working with Revit.
Whether you're prototyping buildings, exploring design options, or querying spatial data, the ability to converse with your BIM software changes the workflow entirely. Focus on what you want to build—not how to build it in the software.
## Open Source, Open Possibilities 🌐
This project remains open source under its original license. Sparx's fork adds enhancements and will continue to evolve alongside the upstream project. We're proud to contribute to an ecosystem that makes AI-powered development accessible to more people.
**Building something with AI?** We'd love to hear about it. Reach out at [hello@workingdevshero.com](mailto:hello@workingdevshero.com) or [start your project](/contact).
---
# From WordPress to Astro in 3 Hours: Rebuilding Our Site with Claude Code
> How AI has transformed web development and why we rebuilt Working Dev's Hero from the ground up using Claude Code and Opus 4.5.
- Published: 2025-12-26
- Author: bobbyg603
- Categories: AI, Software
- Tags: ai, claude, web development, astro, productivity
- Canonical: https://workingdevshero.com/blog/site-redesign-claude-code/
## How It Started 🚀
Working Dev's Hero launched as a WordPress site with a simple mission: become a publication for tips, tricks, and tutorials. Write articles. Share insights. Help developers level up.
AI changed everything.
Developers no longer need to bookmark tutorial sites or wait for blog posts. They ask an AI assistant and get answers instantly, tailored to their exact situation. Learning on the fly has become standard practice.
## New Direction 🎯
This shift prompted a rethink of what Working Dev's Hero should become. Rather than competing with AI as an information source, we decided to embrace it as our core methodology. The focus is now entirely on AI-enabled development:
- **Full-Stack Product Development** — Building customer-facing applications with AI as a force multiplier
- **Operations & AI Integration** — Helping businesses overhaul internal processes to unlock AI's potential
- **Strategic Consulting** — Guiding organizations to leverage AI for maximum effectiveness
A new product is also in development (announcement coming soon).
## The Catalyst 💡
The idea to rebuild came from [a post by Lee Robinson](https://x.com/leerob/status/1999513884382597485) discussing how Cursor moved away from their CMS. The reasoning resonated—sometimes the best approach is to simplify, own your content directly, and leverage modern tooling.
Bobby had a little time between Christmas and New Years and had wanted to try Claude Code for a while. Then Anthropic announced a [Holiday 2025 usage promotion](https://support.anthropic.com/en/articles/13163666-holiday-2025-usage-promotion) with increased Claude limits. Perfect timing.
## Three Hours ⏱️
Downloaded Claude Code. Configured the Puppeteer MCP server. Gave it a straightforward task: inventory the current Working Dev's Hero WordPress site and copy over all pages, including every blog article verbatim.
Claude Code, powered by Opus 4.5, methodically crawled the existing site, extracted the content, and rebuilt everything in Astro—a modern static site generator that's fast, flexible, and developer-friendly. Navigation, blog posts, portfolio pages, services section, shop. All of it.
Three hours later: a fully functional, production-ready website matching the original content with a fresh, modern design.
## What This Means 🦸
This experience crystallized everything Working Dev's Hero has been thinking about. AI isn't just a tool for answering questions or generating boilerplate. It's a genuine collaborator capable of substantial, complex tasks.
The site you're reading right now is proof. Every page, every component, every line of CSS was either created or refined through conversation with Claude. The curved hero section, the purple gradient, the portfolio case studies—all emerged from back-and-forth dialogue about what to build.
But here's the thing: AI didn't do *everything*. The Printful integration for the shop, the contact form, and the newsletter subscription all required manual reintegration. These are the pieces that need human expertise—understanding third-party APIs, handling authentication flows, ensuring data actually gets to where it needs to go.
This is where you want a trusted partner. This is where you want Working Dev's Hero.
## Looking Forward 🔮
A single developer with the right AI tools can now accomplish what previously required a team. That's not about replacing people—it's about amplifying what's possible.
Working Dev's Hero is positioned to help others navigate this transition. Whether building a product, optimizing internal operations, or figuring out how AI fits into your workflow, we've been in the trenches.
The WordPress site served well. This new chapter, built on modern technology and powered by AI collaboration, feels like exactly where we need to be.
**Have you rebuilt a project using AI tools? Tell us about it on [X @workingdevshero](https://x.com/workingdevshero)!**
---
# Hero Stack: GitHub Copilot
> Driver assistance for VS Code. A comprehensive review of GitHub Copilot's features, value, and how it fits into the developer workflow.
- Published: 2023-08-24
- Updated: 2023-09-01
- Author: bobbyg603
- Categories: AI, Reviews
- Tags: ai, copilot, github, llm
- Canonical: https://workingdevshero.com/blog/hero-stack-github-copilot/
## Overview ✈️
GitHub Copilot functions as an AI-powered code completion system integrated into VS Code. The tool provides autocomplete suggestions that exceed traditional code completion capabilities. Users can either accept automatic suggestions or use natural language comments to specify desired functionality. Beyond autocompletion, the platform includes a ChatGPT-style chat interface within the editor.
## Beginner Friendliness 🐣
The extension embeds directly into the widely-used VS Code environment, making it approachable for newcomers. Basic features like intelligent type-ahead recommendations extend existing tab-completion functionality. However, "the documentation for Copilot is so sparse that it feels almost non-existent" for users wanting to leverage advanced features like chat and multi-line completions. Maximizing effectiveness requires substantial self-directed exploration.
## Value 💰
At $10 monthly, the service delivers significant return on investment. The tool reduces keystrokes per line of code and mirrors driver-assistance systems, which research indicates "decrease cognitive burden, resulting in more hours of operation." Direct IDE integration eliminates context-switching costs compared to external tools like ChatGPT.
## UI/UX 🎨
Copilot integrates seamlessly into VS Code, feeling like a natural extension. The sidebar chat panel provides ChatGPT-like functionality. An inline chat feature displays suggestions directly in code, though these recommendations are currently problematic, often adding duplicate lines or misunderstanding tasks.
## WDH 🦸
The Working Dev's Hero team frequently uses Copilot, particularly for test writing. The tool excels at generating tests without fatigue, reducing cognitive load and freeing developers for other productive work.
---
# Hero Stack: ChatGPT
> ChatGPT represents a breakthrough application that achieved unprecedented growth. This review explores its features, value, and how it fits into the Working Dev's Hero toolkit.
- Published: 2023-08-23
- Author: bobbyg603
- Categories: AI, Reviews
- Tags: ai, chatgpt, openai
- Canonical: https://workingdevshero.com/blog/hero-stack-chatgpt/
## Overview ✈️
ChatGPT represents the breakthrough application that initiated the current AI transformation. As the fastest-growing platform in history, it attracted 100 million users within sixty days, making large language models accessible to mainstream audiences. OpenAI distributes ChatGPT through straightforward web and mobile interfaces. The platform provides access to either GPT-3.5 or GPT-4 models alongside numerous extensions. Recently, OpenAI introduced "Code Interpreter," enabling ChatGPT to "write and execute code at a level similar to a very eager junior programmer." This versatile AI system received training using "a massive sample of the publicly available internet" from the Common Crawl dataset.
## Beginner Friendliness 🐣
ChatGPT ranks among the most beginner-accessible applications available. The interface employs standard design conventions, and the conversation format resembles typical smartphone communication. Registration requires only an email address or accounts from Google, Microsoft, and Apple. Users simply submit messages (prompts) to initiate interactions. OpenAI's system either provides helpful responses or declines questions the company considers harmful.
## Value 💰
OpenAI provides free ChatGPT access with substantial capabilities. While unprecedented compared to previous chatbots, the complimentary GPT-3.5 model has limitations. The model's training dataset has age and size constraints, plus a shorter context window. GPT-3.5 experiences "memory issues and has a tendency to hallucinate." The paid alternative, GPT-4, substantially addresses these problems. Premium subscriptions begin at twenty dollars monthly, providing GPT-4 access, plugin functionality, and API usage capabilities. Plugins considerably enhance ChatGPT's usefulness, with the available collection expanding continuously. Though pricier than comparable tools like Midjourney, ChatGPT delivers exceptional value for high-productivity professionals.
## UI/UX 🎨
OpenAI's web and mobile platforms combine functionality with intuitive design. The chat interface requires no learning curve for anyone familiar with smartphones or computers. Code Interpreter and plugins effectively translate natural language requests into specific tool-driven actions. However, power users face minor inconveniences. Extended prompts and lengthy responses require exiting the chat application to access OpenAI's sandbox environment. Additionally, plugin discovery presents challenges—the directory exists only within the application, lacks effective search capabilities, and provides insufficient discovery tools.
## WDH 🦸
ChatGPT occupies a central position within Working Dev's Hero's recommended toolkit. OpenAI created "a top-notch personal assistant that's always willing to help." Most ChatGPT responses demonstrate accuracy and clear information presentation. The potential applications appear virtually limitless. The primary drawback: ChatGPT functions outside standard workflows. Constant application switching and copy-paste dependency introduce friction that diminishes potential productivity improvements. Fortunately, OpenAI's GPT-4 API enables direct integration into existing tools, and platforms increasingly embed GPT-4 natively. ChatGPT represents transformative technology achieving faster adoption than any previous application because it delivers genuine value for technical professionals.
---
# Hero Stack: Midjourney
> Midjourney stands out as a powerful yet unconventional AI image-generation platform. This review covers its unique Discord-based interface and exceptional output quality.
- Published: 2023-08-23
- Author: bobbyg603
- Categories: AI, Reviews
- Tags: ai, generativeai, midjourney
- Canonical: https://workingdevshero.com/blog/hero-stack-midjourney/
## Overview ✈️
"Midjourney is a quirky and fun AI image-generation tool that's also extremely powerful." Despite operating without a traditional UI, the platform leads the image generation market. Users access it exclusively through Discord, not a conventional web or mobile application. While this unconventional approach creates friction, the substantial value proposition compensates for the setup complexity.
## Beginner Friendliness 🐣
The Discord-only interface presents a steep learning curve for newcomers. The platform lacks an intuitive onboarding experience, making initial navigation confusing. However, an extensive community provides readily available guidance through online searches. Once users master Discord fundamentals, the tool becomes approachable, though the entry barrier limits beginner-friendliness.
## Value 💰
Image quality produced by Midjourney is "astounding." The tool excels for creative content requiring sophisticated visuals unavailable on stock image sites. Users can customize parameters including lighting, color, style, and aspect ratio to generate customized scenes. The entry tier costs $10 a month and includes 200 minutes of generation time, yielding approximately 200 images monthly, with unused time rolling over.
## UI/UX 🎨
Initial access feels awkward. Image generation occurs via Discord slash commands—an atypical design choice diverging from standard web applications. The high-volume Midjourney server moves text rapidly, making it easy to lose track. However, users can add the Midjourney bot to personal servers for reduced noise. The platform does offer a web application for viewing past generations, discovering similar work, curating favorites, and providing model-training feedback. Once operational, the Discord interface proves efficient and productive.
## WDH 🦸
Working Dev's Hero identifies this as "the most commonly used tool" in their production stack. The team generates blog post images and YouTube thumbnails exclusively using Midjourney. The platform delivers significantly more unique and creative results compared to Unsplash and Shutterstock alternatives. Cost analysis demonstrates competitive pricing: Shutterstock charges $29 per month for 10 images ($3 per image), while $10 a month Midjourney permits approximately 150 prompt attempts, typically requiring fewer than 10 iterations for usable results—approximately $0.20 per image. Unsplash remains free but cannot match the generative AI scope.
---
# Adventures in AI: MetaGPT - Assembling the AI Dream Team
> Exploring MetaGPT's multi-agent framework that emulates a software development company. Can AI agents work together to build real applications?
- Published: 2023-08-19
- Updated: 2023-08-24
- Author: bobbyg603
- Categories: AI, Lifestyle
- Tags: ai, chatgpt, llm, metagpt, openai
- Canonical: https://workingdevshero.com/blog/adventures-in-ai-metagpt/
## Dream Team 🏀
Every entrepreneur desires a team of exceptional developers who can "author commits at a pace that would make Speedy Gonzales look like Slowpoke Rodriguez." Intelligent agents represent progress toward rapid application development. Projects like BabyAGI and AutoGPT demonstrated impressive results, yet faced inherent constraints. MetaGPT differentiates itself through a novel architecture: "By creating a system of agents with specific roles, inter-agent communication, standardized operating procedures (SOPs), and validation protocols, MetaGPT achieves results significantly better than single autonomous agents."
## Research 🔬
On August 1, 2023, researchers published "MetaGPT: Meta Programming for Multi-Agent Collaborative Framework," describing an approach where AI assumes various software development roles. The team "created fully functioning Python applications by creating agents with specific roles, the ability to communicate, access a shared memory store, and validate its outputs."
I spent my first day off in months exploring MetaGPT's research paper and GitHub repository to determine if it could fulfill the promise of being an exceptional development team.
## Analysis 📋
Results were encouraging but revealed limitations. While MetaGPT "did a great job creating simple, runnable Python programs, the outputs weren't perfect." Common issues included outdated dependencies and breaking changes when upgrading packages.
The tool excelled at scaffolding unfamiliar frameworks. When specifying Flask and Pygame, "MetaGPT was able to bootstrap projects much faster than I would have been able to by myself."
I acknowledged that increased prompt specificity often led to different issues, creating a "Whac-a-Mole" situation of fixing one bug while introducing another.
## Closing Thoughts 💭
Modeling autonomous agents after development teams is innovative and produces exciting results. However, "Autonomous agents can't yet bootstrap entire SaaS companies, but they are shaping up to be a powerful tool for software developers."
MetaGPT works well for quickly spinning up APIs or creating how-to examples. It's not yet ready to replace junior developers.
## Share Your Experience 🙋
What are your experiences with MetaGPT? Tell us on [X @workingdevshero](https://x.com/workingdevshero)!
---
# Tips & Tricks: Deno Scripting
> Type-safe scripts with invisible dependencies. Learn why Deno is the perfect choice for cross-platform scripting with TypeScript support.
- Published: 2023-08-11
- Updated: 2023-08-23
- Author: bobbyg603
- Categories: Tips & Tricks, Software
- Tags: software, tips & tricks, tools, typescript
- Canonical: https://workingdevshero.com/blog/tips-tricks-deno-scripting/
## Scripting ✍️
I recently created a script to manipulate JSON and generate zip files from folder collections. Historically, platform-native scripting languages like bash (Linux/MacOS) or PowerShell (Windows) were used. However, these untyped languages present challenges: they lack cross-platform compatibility, are difficult to debug, and contain unfamiliar syntax patterns that reduce efficiency.
## Node ❌
Integrating Node.js scripts into non-Node projects requires substantial boilerplate setup. The approach demands a `package.json` file for dependency management, and installing dependencies creates a bloated `node_modules` folder in the project root. TypeScript configuration for Node.js requires additional effort. While global dependencies could theoretically bypass `package.json`, implicit dependency management creates issues for team collaboration and CI/CD environments. Node.js works well within Node-specific projects but isn't ideal for automating tasks across different project types.
## Python ❌
Python is commonly selected for project task automation due to its debuggability, dependency management, and cross-platform support. However, developers who prioritize type safety encounter limitations: "Python's type support isn't native to the language, and often isn't provided by package authors." For unfamiliar languages and packages, native type availability improves development speed by reducing documentation research time.
## Deno ✅
According to deno.land, Deno is "the easiest, most secure JavaScript runtime" and offers "the best developer experience without the learning curve."
Dependencies are defined by importing modules directly from URLs in files requiring them. Missing dependencies auto-detect and install automatically when scripts run. Native TypeScript support eliminates `tsconfig.json` configuration and CommonJS/ESM concerns. The ecosystem features strongly typed packages without additional setup. VS Code supports Deno debugging through the Deno extension; initialization requires running `Deno: Initialize Workspace Configuration`.
## Share Your Experience 🙋
What are your experiences with Deno? Tell us on [X @workingdevshero](https://x.com/workingdevshero)!
---
# Copilot Tips: Sync/Async
> Use Copilot Chat to convert between synchronous and asynchronous functions in TypeScript. A quick refactoring tip.
- Published: 2023-08-09
- Updated: 2023-08-23
- Author: bobbyg603
- Categories: AI, Tips & Tricks
- Tags: ai, copilot, typescript, refactoring
- Canonical: https://workingdevshero.com/blog/copilot-tips-sync-async/
## Overview
This article provides guidance on using GitHub Copilot Chat to efficiently refactor TypeScript function signatures between synchronous and asynchronous patterns.
## Requirements
- Visual Studio Code 1.80.1 or newer
- GitHub Copilot extension
- Copilot Chat extension installed
## The Technique
The process involves three straightforward steps:
1. Highlight the code block containing the function
2. Press `cmd + i` to launch the inline chat interface
3. Request that Copilot convert the function between async and sync formats
## Bidirectional Capability
The approach works in both directions—you can transform asynchronous functions into synchronous ones, or vice versa, making it adaptable to various refactoring scenarios.
## Example
**To make async:**
```
Hit cmd + i and ask: "Make this function async"
```
**To make sync:**
```
Hit cmd + i and ask: "Make this function synchronous"
```
## Target Audience
This tip specifically addresses TypeScript developers seeking efficient ways to manage function signature updates within their development workflow.
**What other refactoring patterns do you use Copilot for? Share below!**
---
# Copilot Shorts: Imports
> Use Copilot Chat to replace CommonJS require statements with ES6 imports. Modernize your codebase quickly.
- Published: 2023-06-30
- Updated: 2023-10-03
- Author: bobbyg603
- Categories: AI, Tips & Tricks
- Tags: ai, chatgpt, copilot, github, llm, openai
- Canonical: https://workingdevshero.com/blog/copilot-shorts-imports/
## Overview
This tutorial demonstrates how to leverage GitHub Copilot Chat to convert Node.js `require` statements into modern ES6 `import` syntax.
## Requirements
1. Visual Studio Code Insider's build
2. Copilot Chat extension
3. Copilot Nightly extension
## The Process
1. Select the code block containing require statements
2. Press **Command+I** to open inline chat
3. Request conversion: "Convert these requires to import statements"
4. Copilot generates the updated code
**Pro tip:** Press `Command+I` to bring up inline chat for quick code transformations.
## Before
```javascript
const express = require('express');
const path = require('path');
const fs = require('fs');
```
## After
```javascript
import express from 'express';
import path from 'path';
import fs from 'fs';
```
## Conclusion
The combination of VS Code Insider's build with Copilot Chat and Copilot Nightly enables TypeScript developers to efficiently modernize their codebase by replacing CommonJS require patterns with ES6 imports.
**What legacy code patterns do you use Copilot to fix? Share below!**
---
# Copilot Shorts: Test Data
> Use Copilot Chat to generate test data for your TypeScript interfaces. Speed up your testing workflow.
- Published: 2023-06-26
- Author: bobbyg603
- Categories: AI, Tips & Tricks
- Tags: ai, chatgpt, copilot, github, llm, openai
- Canonical: https://workingdevshero.com/blog/copilot-shorts-test-data/
## Overview
This brief tutorial demonstrates how TypeScript developers can efficiently generate test data using GitHub Copilot.
## Prerequisites
To implement this technique, you'll need:
- Visual Studio Code Insider's build
- Copilot Chat extension
- Copilot Nightly
## The Process
The workflow involves three straightforward steps:
1. **Locate your interface definition** and copy it from your codebase
2. **Open Copilot Chat** within your IDE
3. **Request test data generation** by asking: "Generate test data that matches this interface"
## Key Benefit
This method eliminates manual data creation for complex objects, saving you considerable time and effort during test preparation.
No more hand-crafting mock data for your unit tests!
## Conclusion
This technique provides a quick solution for TypeScript developers who need to rapidly generate realistic test data for large or complicated object structures.
**How do you generate test data in your projects? Share your approach!**
---
# Copilot Shorts: TS Types
> Use Copilot Chat to generate TypeScript interfaces for objects. Perfect for quickly typing API responses.
- Published: 2023-06-26
- Updated: 2023-08-23
- Author: bobbyg603
- Categories: AI, Tips & Tricks
- Tags: ai, chatgpt, copilot, github, llm, openai
- Canonical: https://workingdevshero.com/blog/copilot-shorts-ts-types/
## Overview
This quick tip demonstrates how to automatically generate TypeScript type interfaces from JavaScript objects using GitHub Copilot Chat.
## Requirements
To implement this tip, you'll need:
- Visual Studio Code Insider's build
- GitHub Copilot Chat
- Copilot Nightly
## Workflow
1. Copy an object received from a fetch request
2. Open Copilot Chat
3. Ask: "Generate a TypeScript interface for this object"
4. Copilot generates the corresponding interface
**Note:** Sometimes the chat interface may display a filtered response message, yet the actual generated code will be correct when pasted into the editor.
## Benefits
This technique streamlines TypeScript development by automating interface generation, saving you time when working with API responses.
If you copy the response and paste it in your editor, you'll notice it's correct—even when the chat indicates content filtering.
## Takeaway
This tip is especially valuable for developers frequently handling external data sources who need rapid type definitions without manual coding.
**What other Copilot tips do you use for TypeScript? Share below!**
---
# Copilot Shorts: tsconfig
> Use Copilot Chat to remove comments from tsconfig.json files. A quick tip for TypeScript developers.
- Published: 2023-06-26
- Author: bobbyg603
- Categories: AI, Tips & Tricks
- Tags: ai, chatgpt, copilot, llm, openai
- Canonical: https://workingdevshero.com/blog/copilot-shorts-tsconfig/
## Overview
TypeScript developers frequently receive `tsconfig.json` files containing embedded comments. Since JSON doesn't officially support comments, these files require special handling.
This quick tip shows how to leverage AI tools to remove these comments efficiently.
## Requirements
To implement this technique, you'll need:
- Visual Studio Code Insider's build
- GitHub Copilot Chat extension
- Copilot Nightly extension
## The Process
1. Select the configuration text in your editor
2. Open the Copilot Chat interface
3. Request comment removal: "Remove the comments from this JSON"
You can take this text, open chat, and just ask Copilot to remove the comments. Cool!
## Benefits
This approach produces cleaner, more standardized TypeScript configuration files without manual editing, making it particularly useful for developers managing multiple project configurations.
**Have you found other uses for Copilot with config files? Tell us on [X @workingdevshero](https://x.com/workingdevshero)!**
---
# Publish WordPress Posts to Discord
> Automatically share your WordPress blog posts to Discord using IFTTT. A step-by-step integration guide.
- Published: 2023-06-26
- Updated: 2023-08-23
- Author: bobbyg603
- Categories: Tips & Tricks, Tutorials
- Tags: automation, discord, ifttt
- Canonical: https://workingdevshero.com/blog/publish-wordpress-posts-to-discord/
## Prerequisites ✅
To configure IFTTT to publish recent WordPress posts to Discord, you'll need:
- WordPress User with Two-Step Authentication
- Discord Server
- IFTTT Account
This setup takes 15 minutes or less.
## Steps 🥾
### Step 1: Create Application Password
Navigate to Users > Your Profile > New Application Password in WordPress. Name the password and copy the generated value for later use.
### Step 2: Configure AIOSEO Settings
Set the "Default Post Image Source" to "Featured Image" under AIOSEO > Social Networks > Facebook. This ensures Discord uses the post's featured image for preview.
### Step 3: Create IFTTT Applet
Log into IFTTT.com and create a new applet by clicking "Add" next to "If This."
### Step 4: Connect WordPress Integration
Search for WordPress in the integrations list and authorize the connection.
### Step 5: Set Trigger
Select "Any new post" as your trigger condition.
### Step 6: Configure Discord Action
Click "Add" next to "Then That" and connect your Discord channel. Select "Post a message to a channel" and remove "Post Content" from the message field to avoid truncation issues.
### Step 7: Test Integration
Create a new WordPress post or click "Check Now" in your IFTTT applet. A formatted message with the post title, featured image, and link should appear in your Discord channel.
**What other automations do you use for your blog? Share below!**
---
# Adventures in AI: QR Codes
> Use AI to generate beautiful, unique QR codes using Stable Diffusion. Learn how to create artistic QR codes that still work.
- Published: 2023-06-25
- Updated: 2023-08-23
- Author: bobbyg603
- Categories: AI, Lifestyle
- Tags: ai, generativeai, llm, openai, photoshop, stable diffusion
- Canonical: https://workingdevshero.com/blog/adventures-in-ai-qr-codes/
## Call to Adventure 📞
AI augmented QR codes are all the rage in the AI world right now. People are using AI and Stable Diffusion to generate beautiful, unique QR codes. Creating visually striking QR codes through artificial intelligence has become a trending topic in tech circles. I discovered examples shared by @rowancheung on Twitter, originally credited to u/nhciao on Reddit, showcasing beautiful, unique QR codes generated using AI and Stable Diffusion.
Featured examples include artistic interpretations like an ancient village scene, Japanese painting style, and a printed circuit board design—all while maintaining QR code functionality.
## Down the Rabbit Hole 🐇
Investigation revealed that most QR codes were generated through two primary platforms:
- **QR Code AI Art Generator** (Hugging Face Space)
- **Quick QR Art Discord Channel**
I initially struggled with the Hugging Face Space, mistakenly attempting to upload background images instead of QR codes. After reviewing the Quick QR Art documentation and studying Discord channel prompts, I successfully created multiple examples.
### Sample Creations with Prompts
**Funky:**
```
graphic design, primary colors, primitive shapes --qrw 0.95 --steps 16 --seed 7581777480381614
```
**Doggos:**
```
dogs playing in a green prairie under the sun --qrw 0.95 --steps 16 --seed 8160813035284072
```
**Mountains:**
```
mountains and trees, aesthetic, realistic --presets intricate-studio --qrw 0.9 --steps 18 --seed 5676602113908140
```
## Surfacing 🌇
After experimenting with Quick QR Art's Discord bot, I generated a city skyline QR code for the website using the prompt:
```
city skyline at sunset, aesthetic, realistic --presets intricate-studio --qrw 0.95 --steps 18 --seed 6255550864009378
```
## Bonus 🤑
I extended the QR code image using Adobe Photoshop's Generative Fill feature:
1. Created a 1280×720 pixel canvas
2. Centered the QR code
3. Removed edge artifacts via selection tools
4. Inverted the selection to apply generative fill with the prompt: "Extend the city without the QR code artifacts in the sky or buildings"
This technique successfully expanded the cityscape background while preserving QR code functionality, resulting in a beautiful cover image.
**Have you tried creating AI-generated QR codes? Share your results!**
---
# ChatGPT: Practice Makes Perfect
> How deliberate practice improves your proficiency with Large Language Models. Learn practical strategies for better AI interactions.
- Published: 2023-04-25
- Updated: 2023-08-23
- Author: bobbyg603
- Categories: Tips & Tricks
- Tags: chatgpt, ai, llm, tips
- Canonical: https://workingdevshero.com/blog/chatgpt-practice-makes-perfect/
## Quote 💬
> "The Best Way to Get Better at Photography? Take More Photos!"
## Practice Makes Perfect ☑️
Humans learn through feedback—both from failure and success. Trying repeatedly develops new abilities faster than theoretical study alone. This concept is inspired by *Atomic Habits by James Clear*, specifically the segment discussing "the value of trial, error, and experimentation."
## Photography 📸
Professor Jerry Uelsmann conducted an experiment at the University of Florida. He divided his photography class into two groups:
- **Quantity group:** graded solely on volume of photos produced
- **Quality group:** graded on one perfect photograph
The quantity group spent the semester experimenting and refining their process. The quality group deliberated extensively or procrastinated. By semester's end, the quantity group produced "all of the best photos." The lesson: "Learning requires trial, error, and deliberate practice."
## Prompt Engineering 🗣️
Prompt engineering is discovering inputs yielding useful results in natural language processing. LLMs represent emerging technology requiring experimentation to master.
## Procrastiworking 🙉
I've been using ChatGPT while "procrastiworking" and achieving effective prompts after months of experimentation. The iterative process of prompt refinement has proven essential.
## Analysis 🔬
Key findings from ChatGPT conversations:
1. **Context matters:** Providing background allows novel, unique responses
2. **Request variations:** Asking for multiple responses offers options
3. **Initial results felt formulaic:** Responses contained "pre-packaged and boring" introductory sentences
4. **Iteration improved results:** Re-prompting the AI produced better output
5. **Narrative injection worked:** Adding storylines enhanced creativity
## Takeaways 💭
Recommended prompt techniques:
- Provide background context or request interesting personas
- Ask for multiple responses and expand favorites
- Inject narrative elements into conversations
**Recommended Resources:**
- TLDR Newsletter
- The Rundown AI Newsletter
- Built with AI
**What prompting techniques have worked best for you? Share below!**
---
# Origin Story: Working Dev's Hero
> Why Working Dev's Hero exists and how it helps developers and entrepreneurs become more effective and find meaning in their work.
- Published: 2023-04-25
- Updated: 2024-02-09
- Author: bobbyg603
- Categories: Lifestyle
- Tags: working devs hero, tips, tricks, ai, news
- Canonical: https://workingdevshero.com/blog/working-devs-hero-origin/
## Quote 💬
> "If you want to stand out, don't be different; be outstanding"
— Meredith West
## Origin Story 🦸
The piece opens with a narrative depicting an overwhelmed developer "toiling away" beneath excessive workload, longing for professional meaning. The developer experiences frustration with monotony and releases emotional tension.
Despite accelerating innovation, many technical professionals report unfulfilling roles lacking genuine responsibility or accomplishment. Conversely, some developers juggle excessive responsibilities while battling exhaustion from startup environments attempting to compete against major corporations.
Working Dev's Hero positions itself as a resource for developers and entrepreneurs seeking effectiveness, doing more with limited resources, and finding professional purpose.
## What To Expect 📈
The newsletter covers:
- Artificial Intelligence and Large Language Models integrated into workflows
- Enterprise systems using Docker and Kubernetes
- Clean, maintainable code practices
- Life optimization for productive development work
## About the Creator
I created this publication after ten years in software development, having experienced roles emphasizing high effectiveness and scalable systems. The initiative aims to connect similarly-minded professionals passionate about building software.
## Join the Journey
Subscribe to the Working Dev's Hero newsletter to begin your own hero's journey of professional development.
**What brought you here? Tell us on [X @workingdevshero](https://x.com/workingdevshero)!**